MapReduce 程序开发 MapReduce的各个组件需要进行定制开发才能满足业务的需求。
序列化 hadoop 中的序列化是为了数据能够持久化和网络传输的便携性。
因为java的序列化会覆盖很多额外的信息所以 hadoop 有自己的一套序列化机制。
hadoop 序列化特点
紧凑
高效利用存储空间
快速
读写数据速度快
可扩展
随着通信协议的升级而升级
互操作:能支持不同语言写的客户端和服务端进行交互
Writable Writable 接口是hadoop中的一个序列化接口,可以发现基本数据类型都实现了此接口,以可以实现数据的序列化。
此接口中有2个方法一个是序列化一个是反序列化
void write(DataOutput out) throws IOException;
void readFields(DataInput in) throws IOException;
如果交给hadoop的输出类型是自定义类型,那么我们的自定义类型是一定要实现此接口,才能完成数据的传输和存储。
自定义Bean对象的序列化
实现Writable 接口并重写2个接口 。注意序列化和反序列化的顺序 重写toString 方法是为了能够将结果输出到文件中。 如果需要bean 作为key 传输,还需要实现Comparable. 因为MapReduce框中的Shuffle过程要求对key必须能排序。 使用自定义序列化Bean 需求:从日志文件中统计用户的访问次数和接口信息。
原始日志文件
1
2
3
4
5
6
7
8
zhangsan /api1 2 lisi /api1 6 zhangsan /api1 2 lisi /api2 1 zhangsan /api2 1
lisi /api2 2 /api1 6
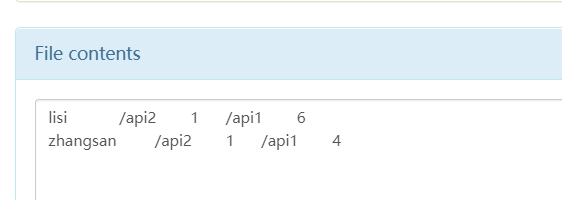
最终希望获取的结果
1
2
3
zhangsan /api1 4 /api2 1 lisi /api1 6 /api2 1
上传原始文件到hdfs中 1 2 3 hadoop fs -put request.txt /request/request.txt
编写自定义可序列化的 Bean 1 2 3 4 5 6 7 8 9 10 11 12 13 14 15 16 17 18 19 20 21 22 23 24 25 26 27 28 29 30 31 32 33 34 35 36 37 38 39 40 41 42 43 44 45 46 47 48 49 50 51 52 53 54 55 56 57 58 59 60 61 62 63 64 65 66 67 68 public class RequestCount implements Writable,Iterable<Map.Entry<String,Long>>{ private Map<String,Long> urlCounts = new LinkedHashMap<>(); public void addCount(String url,Long count){ Long oldCount = urlCounts.get(url); if(oldCount == null){ oldCount = new Long(0); } urlCounts.put(url,oldCount + count); } @Override public Iterator<Map.Entry<String,Long>> iterator() { return urlCounts.entrySet().iterator(); } @Override public void write(DataOutput out) throws IOException { //写入数量多少 out.writeInt(urlCounts.size()); //序列化方法 Set<Map.Entry<String, Long>> entries = urlCounts.entrySet(); for (Map.Entry<String, Long> entry : entries) { String key = entry.getKey(); Long value = entry.getValue(); byte[] bytes = key.getBytes(StandardCharsets.UTF_8); //记录字符串的长度 out.writeInt(bytes.length); out.write(bytes); out.writeLong(value); } } @Override public void readFields(DataInput in) throws IOException { urlCounts = new LinkedHashMap<>(); //反序列化 int i = in.readInt(); while (i-- > 0){ //循环读取数据 int keyLen = in.readInt(); byte[] keyBuffer = new byte[keyLen]; in.readFully(keyBuffer); long valueCount = in.readLong(); urlCounts.put(new String(keyBuffer),valueCount); } } @Override public String toString() { StringBuffer sb = new StringBuffer(); Set<Map.Entry<String, Long>> entries = urlCounts.entrySet(); for (Map.Entry<String, Long> entry : entries) { sb.append("\t"); sb.append(entry.getKey()); sb.append("\t"); sb.append(entry.getValue()); } return sb.toString(); }
实现自定义的序列化方法和自定义的toString 方法,toString在写入文件的时候会调用
Mapper方法 1 2 3 4 5 6 7 8 9 10 11 12 13 14 15 16 public class RequestCountMapper extends Mapper<LongWritable, Text,Text,RequestCount> { @Override protected void map(LongWritable key, Text value, Context context) throws IOException, InterruptedException { String[] split = value.toString().split(" "); RequestCount requestCount = new RequestCount(); requestCount.addCount(split[1],Long.valueOf(split[2])); Text nameText = new Text(split[0]); context.write(nameText,requestCount); } }
Reduce 方法 1 2 3 4 5 6 7 8 9 10 11 12 13 14 15 16 17 18 19 20 21 22 23 24 public class RequestCountReduce extends Reducer<Text,RequestCount,Text,RequestCount> { private static final Logger logger = LoggerFactory.getLogger(RequestCountReduce.class); @Override protected void reduce(Text key, Iterable<RequestCount> values, Context context) throws IOException, InterruptedException { RequestCount resultRequestCount = new RequestCount(); Iterator<RequestCount> iterator = values.iterator(); while (iterator.hasNext()){ RequestCount next = iterator.next(); Iterator<Map.Entry<String, Long>> entryIterator = next.iterator(); while (entryIterator.hasNext()){ Map.Entry<String, Long> entry = entryIterator.next(); resultRequestCount.addCount(entry.getKey(),entry.getValue()); } } logger.info("reduce out =======>"+resultRequestCount + "key "+key); context.write(key,resultRequestCount); } }
Driver 方法 1 2 3 4 5 6 7 8 9 10 11 12 13 14 15 16 17 18 19 20 21 22 23 24 25 26 27 28 29 30 public class RequestCountDriver { public static void main(String[] args) throws IOException, InterruptedException, ClassNotFoundException { //1. 因为是提交job信息,所以通过配置获取到job对象 Configuration configuration = new Configuration(); Job job = Job.getInstance(configuration); //设置jar的地址 job.setJarByClass(RequestCountDriver.class); job.setMapperClass(RequestCountMapper.class); job.setReducerClass(RequestCountReduce.class); job.setMapOutputKeyClass(Text.class); job.setMapOutputValueClass(RequestCount.class); job.setOutputKeyClass(Text.class); job.setOutputValueClass(RequestCount.class); FileInputFormat.setInputPaths(job,new Path(args[0])); FileOutputFormat.setOutputPath(job,new Path(args[1])); // 任务提交 boolean ret = job.waitForCompletion(true); System.exit(ret ? 0 : 1); } }
提交运行 1 2 3 hadoop jar mr.jar com.w.mapreduce.request.RequestCountDriver /request /out
输出结果
InputFormat 和 OutPutFormat 是mr 中2个重要的组件,一个用于处理输入数据的格式,一个处理最终的数据的结果数据的输出格式。
inputFormat 中有2个类,一个是获取切面的列表,一个是获取一个 RecordReader。
1 2 3 4 5 6 7 8 9 10 11 12 13 14 List<InputSplit> getSplits(JobContext context ) throws IOException, InterruptedException public abstract RecordReader<K,V> createRecordReader(InputSplit split, TaskAttemptContext context ) throws IOException, InterruptedException
数据从磁盘上读取后,通过 InputFormat 处理后 交给Mapper进行处理。
JOb 的Map 阶段 的基本执行单位是MapTask,Map阶段由多个MapTask 组成,一个MapTask 处理一个切片数据。 MapTask 决定了大数据量的处理速度。
假设一个文件大小为 300M,切片大小为 100M,那么将切分成 0-100 100-200 200-300 3个切片,此切片是逻辑切片,只表示多个MapTask分开处理部分数据。
切片是客户端完成的,客户端在提交任务的时候计算出切分成几个分片,提交给yarn 一个split 对应了一个MapTask 默认的切片大小等于block大小,所以默认一个MapTask处理一个块 切片是对文件进行切分,即使提交了多个文件,也是针对每个文件进行切分。(文件级别的切片) 切片的时候要判断切完剩余的部分是否大于块的1.1倍,如果小于就切到一个块中 切片返回的信息包括切片的元数据信息,对应的host 等信息,最终提交给yarn 由MrAppMaster来进行执行。 在Mapper中指定泛型的key value输入格式。这个泛型的具体格式也是在InputFormat 阶段处理的。
InputFormat 中 创建一个 RecordReader 处理读取的文件的格式,默认的是实现类 TextInputFormat 得到的一个key vlaue结果是 (偏移量, 一行的值)
读取文本数据用,得到的输入结果是 偏移量和 一行的文本数据
一行数据被切分成 key值和value 值,可以配置通过什么样的字符进行分割
1 conf.set(KeyValueLineRecordReader.KEY_VALUE_SEPERATOR," ");
他可以使用文本的行数来进行分片而不是数据的大小,比如可以设置 0 -1000 行 1000-2000 行 一个分片,由不同的maptask来处理。
maptask是针对文件进行分片处理的,但是如果文件本身就很小,那么对每个小文件开启一个maptask有点得不偿失,所以可以使用一种多个小文件使用一个maptask的机制。
CombineTextInputFormat 处理过程 CombineTextInputFormat 分为虚拟存储 和 切片 2个部分
CombineTextInputFormat 可以设置一个最大的切分大小。
在处理的时候会对小文件进行遍历
如果小文件大于 maxInputSplitSize 那么生成一个分片 如果小文件小于 maxInputSplitSize 那么作为待分片文件 ,继续下一个文件,和之前的待分片文件 加起来的大小比较是否超过了maxInputSplitSize,还是没超过再加下一个文件,直到超过了分成一个分片 如果输入文件大于设置的最大值且大于两倍,那么以最大值切割一块;当剩余数据大小超过设置的最大值且不大于最大值2倍,此时将文件均分成2个虚拟存储块(防止出现太小切片)。 举例说明:
有4个小文件大小分别为1.7M、5.1M、3.4M以及6.8M这四个小文件,则虚拟存储之后形成6个文件块,大小分别为:
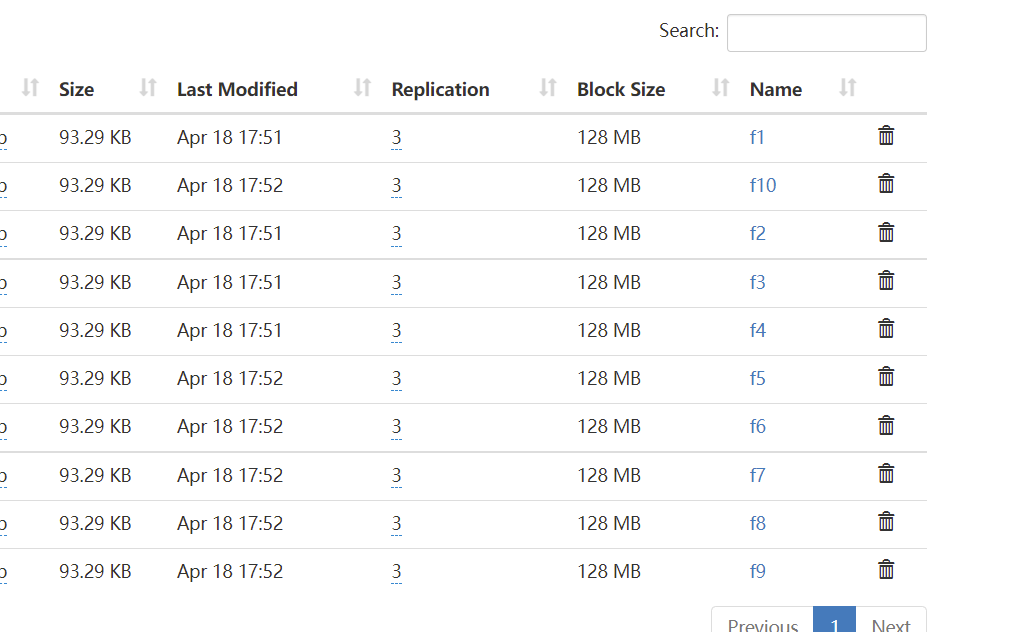
CombineTextInputFormat 操作处理文件 准备10个代批量处理文件
文件的大小都是93k
这里要批量处理他们的workCount 和mapper 和reduce 和基本的workcount 代码一样,只需要修改driver做一些设置 1 2 3 4 5 6 7 8 9 10 11 12 13 14 15 16 17 18 19 20 21 22 23 24 25 26 27 28 29 30 31 32 33 34 35 36 37 38 39 40 41 42 43 44 45 46 47 48 49 50 51 package com.w.mapreduce.combine; import org.apache.hadoop.conf.Configuration; import org.apache.hadoop.fs.Path; import org.apache.hadoop.io.IntWritable; import org.apache.hadoop.io.Text; import org.apache.hadoop.mapreduce.Job; import org.apache.hadoop.mapreduce.lib.input.CombineFileInputFormat; import org.apache.hadoop.mapreduce.lib.input.CombineTextInputFormat; import org.apache.hadoop.mapreduce.lib.input.FileInputFormat; import org.apache.hadoop.mapreduce.lib.output.FileOutputFormat; import java.io.IOException; public class CombineWorkCountDriver { public static void main(String[] args) throws IOException, InterruptedException, ClassNotFoundException { Configuration configuration = new Configuration(); Job job = Job.getInstance(configuration); job.setJarByClass(CombineWorkCountDriver.class); job.setMapperClass(CombineWorkCountMapper.class); job.setReducerClass(CombineWorkCountMapReduce.class); job.setMapOutputKeyClass(Text.class); job.setMapOutputValueClass(IntWritable.class); job.setOutputKeyClass(Text.class); job.setOutputValueClass(IntWritable.class); //设置使用DataInputFormat job.setInputFormatClass(CombineFileInputFormat.class); //设置存储切片的最大值 设置的是 200kb CombineTextInputFormat.setMaxInputSplitSize(job, 204800); FileInputFormat.setInputPaths(job,new Path(args[0])); FileOutputFormat.setOutputPath(job,new Path(args[1])); // 任务提交 boolean ret = job.waitForCompletion(true); System.exit(ret ? 0 : 1); } }
执行任务 1 hadoop jar mr.jar com.w.mapreduce.combine.CombineWorkCountDriver /combine /combine_out
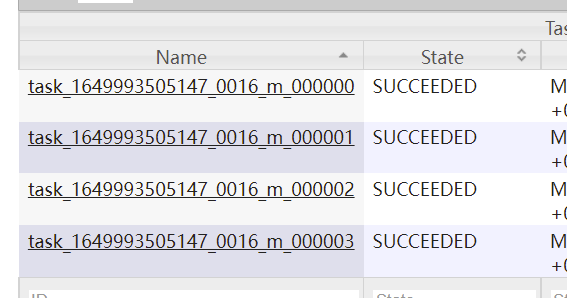
最终结果
通过历史日志服务器可以看到有4个mapTask执行任务
MapReduce 工作流程
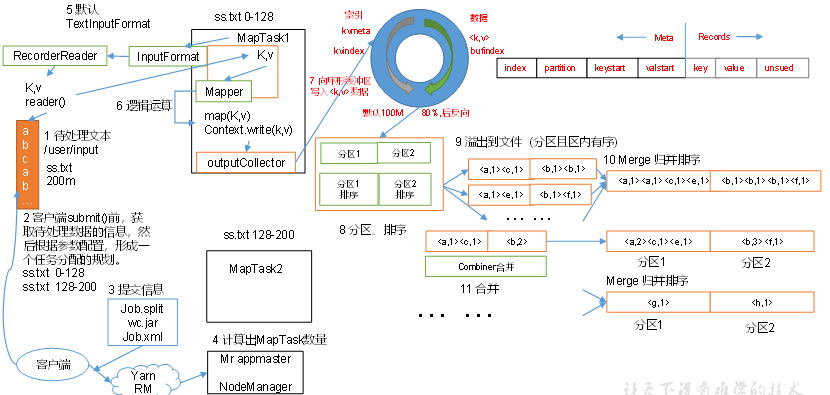
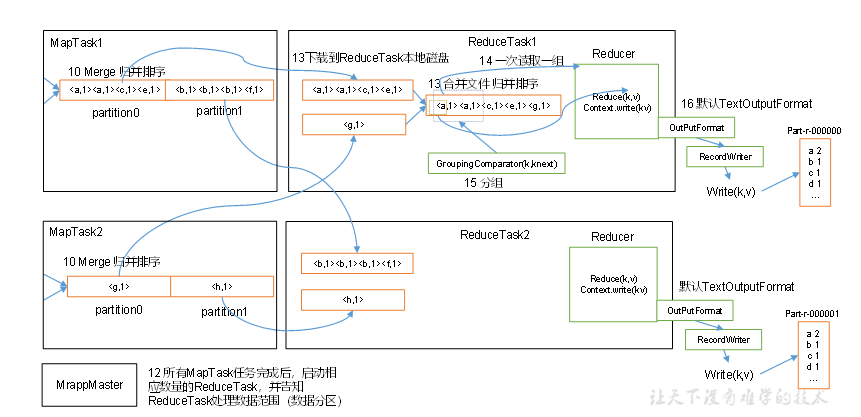
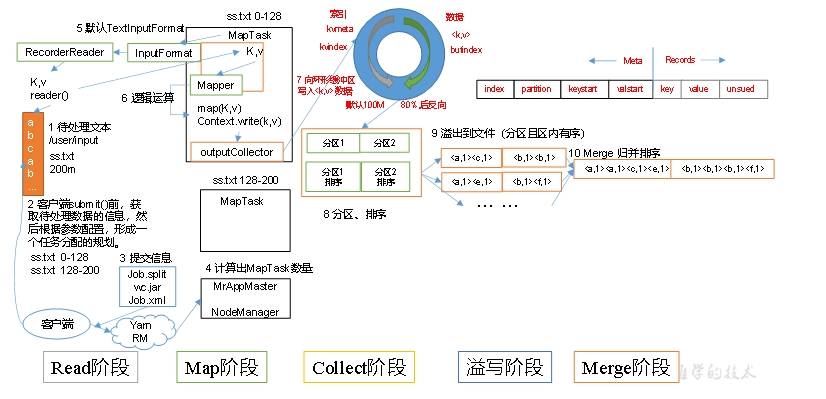
简单说明:MapReduce整个工作流程
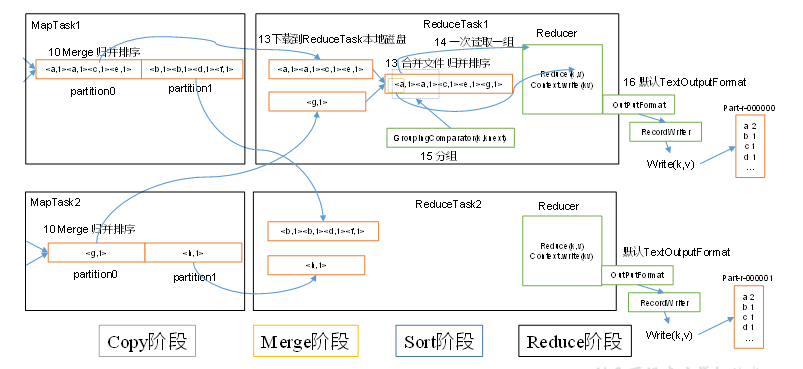
指定数据输入目录,获取多个待处理的数据文件. 客户端根据配置的InputFormat 计算出数据的分块策略等信息,提交给yarn. yarn 的MRAppMaster 执行开启任务资源和计算任务. 对应的配置的 InputFormat 获取到 RecordReader 解析特定格式的数据格式,将解析的数据格式给到Map阶段。 每个MapTask 处理一个分块的数据,每个分块的数据获取一个map结果。 MapTask获取的结果先有序写到缓存区,接着有序溢写多个文件,最终多个有序文件归并排序成一个文件。最终得到每个MapTask 获得一个有序文件 一个分区开启一个ReduceTask ,ReduceTask 开启后从不同的MapTask 获取自己待处理分区的数据. ReduceTask对获取到的多个有序的同一个分区的数据执行排序 ReduceTask 执行reduce计算任务 ReduceTask 最终调用OutputFormat 组件输出特定的数据结果。 Shuffle 机制 在Map输出结果后,Reduce 获取数据前的这一部分流程称为 shuffle 阶段。这是一段混洗的过程。
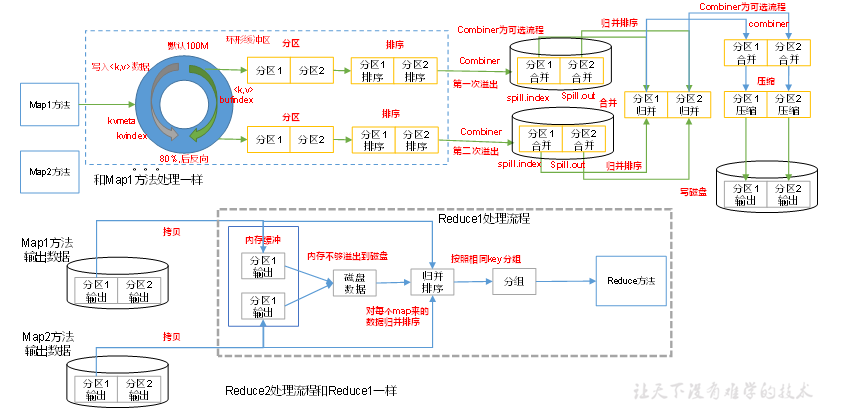
MapTask 将map() 输出的key Value 结果 放到一个内存缓存区中。 内存缓冲区中不断溢出本地磁盘文件,可能会有多个磁盘文件.因为可能会有多次溢出过程。每次溢出一个文件 溢出的文件中会根据每个分区进行分区内的排序。 多个溢出文件会被合并为一个大文件。 在溢出和合并的后还可能执行一个Combine 可选的流程,Combine 流程可以看做是针对特定的业务逻辑,提前对map阶段的一小部分数据执行reduce逻辑,减轻reduce的工作量。(不是所有场景都使用此逻辑) 合并的文件会被压缩和写入到磁盘上,最终由ReduceTask 进行获取不同分区的数据。 环形缓冲区 环形缓冲区 默认大小为 100M,当写入环形缓冲区的数据大于80% 的时候,执行溢写。同时数据从另一端开始反向写。
Partition分区 将输出的结果得key 分为几个类别,每个类别的数据就是一个分区,每个分区由一个特定的Reduce 程序来执行。
分区的抽象类是 org.apache.hadoop.mapreduce.Partitioner,
内部有一个getPartition 方法,根据key value的值和总分区数量,获取数据的分区号。
在shuffer 处理过程中会多次执行分区内的排序和数据处理。
1 2 3 4 5 6 7 8 9 10 11 12 13 14 15 16 17 18 @InterfaceAudience.Public @InterfaceStability.Stable public abstract class Partitioner<KEY, VALUE> { /** * Get the partition number for a given key (hence record) given the total * number of partitions i.e. number of reduce-tasks for the job. * * <p>Typically a hash function on a all or a subset of the key.</p> * * @param key the key to be partioned. * @param value the entry value. * @param numPartitions the total number of partitions. * @return the partition number for the <code>key</code>. */ public abstract int getPartition(KEY key, VALUE value, int numPartitions); }
内置的几种实现
HashPartitioner 默认实现,根据key 的hash 和总分区取模
BinaryPartitioner 根据字节码类型的key的部分进行hash 取模,内部提供了设置leftOffset 和 rightOffset 方法
KeyFieldBasedPartitioner 提供了多个区间计算hash
其他 自定义实现,用的最多的还是自定义根据业务逻辑自定义分区逻辑
自定义分区示例 期望在统计workCount的时候,根据大小写前缀进行分开统计;
新建分区实现类 1 2 3 4 5 6 7 8 9 10 11 12 13 14 15 16 17 18 19 public class CustomPartition extends Partitioner<Text, IntWritable> { @Override public int getPartition(Text text, IntWritable intWritable, int numPartitions) { String s = text.toString(); if(s.length() == 0){ return 0; } char c = s.charAt(0); //如果是 A-Z if(c >= 65 && c <= 90){ return 0; } return 1; } }
在job 上设置分区实现和reduceNum 1 2 3 4 5 //设置分区类 job.setPartitionerClass(CustomPartition.class); //设置reduceTask 数量 job.setNumReduceTasks(2);
最终执行结果:
可以看到生成了2个分区文件。
需要注意分区数量和 ReduceTasks 数量的关系
如果reduceTask 的数量大于分区数,也会生成reduceTask 的数量的文件数,只不过有几个是空的,以为有几个任务是空闲的。 如果reduceTask 大于1 并且小于分区数,会抛异常,因为有分区任务无法处理 如果reduceTask 等于1 ,那么所有的分区都是由这一个task来执行。最终也只生成一个结果文件。 Key排序 MapReduce 中不管是Map输出的结果还是Reduce输出的结果都会根据Key进行排序处理。
MapTask 过程中,map 将结果放到圆形缓冲区,在溢写到磁盘文件的时候,会执行一次快排,当文件执行合并的时候会执行归并排序。
简单的说,对应的key是一定需要能够排序的。
hadoop的内置类型 Text,LongWritable 等都是实现了 WritableComparable 接口,表示既可以序列化也可以排序。
排序示例 如下测试数据
1 2 3 4 5 6 7 8 9 10 11 12 13 14 15 16 17 18 19 20 21 22 23 1 13736230513 192.196.100.1 www.atguigu.com 2481 24681 200 2 13846544121 192.196.100.2 264 0 200 3 13956435636 192.196.100.3 132 1512 200 4 13966251146 192.168.100.1 240 0 404 5 18271575951 192.168.100.2 www.atguigu.com 1527 2106 200 6 84188413 192.168.100.3 www.atguigu.com 4116 1432 200 7 13590439668 192.168.100.4 1116 954 200 8 15910133277 192.168.100.5 www.hao123.com 3156 2936 200 9 13729199489 192.168.100.6 240 0 200 10 13630577991 192.168.100.7 www.shouhu.com 6960 690 200 11 15043685818 192.168.100.8 www.baidu.com 3659 3538 200 12 15959002129 192.168.100.9 www.atguigu.com 1938 180 500 13 13560439638 192.168.100.10 918 4938 200 14 13470253144 192.168.100.11 180 180 200 15 13682846555 192.168.100.12 www.qq.com 1938 2910 200 16 13992314666 192.168.100.13 www.gaga.com 3008 3720 200 17 13509468723 192.168.100.14 www.qinghua.com 7335 110349 404 18 18390173782 192.168.100.15 www.sogou.com 9531 2412 200 19 13975057813 192.168.100.16 www.baidu.com 11058 48243 200 20 13768778790 192.168.100.17 120 120 200 21 13568436656 192.168.100.18 www.alibaba.com 2481 24681 200 22 13568436656 192.168.100.19 1116 954 200
根据不同的手机号的末尾奇数和偶数进行分区统计。
1. 定义数据封装对象,实现WritableComparable
1 2 3 4 5 6 7 8 9 10 11 12 13 14 15 16 17 18 19 20 21 22 23 24 25 26 27 28 29 30 31 32 33 34 35 36 37 38 39 40 41 42 43 44 45 46 47 48 49 50 51 52 53 54 55 56 57 58 59 60 61 62 63 64 65 66 67 68 69 70 71 72 73 74 75 public class FlowCount implements WritableComparable<FlowCount> { private Long lowFlow; private Long upFlow; private Long totalFlow; public FlowCount() { } public FlowCount(Long lowFlow, Long upFlow) { this.lowFlow = lowFlow; this.upFlow = upFlow; this.totalFlow = this.lowFlow + this.upFlow; } public Long getLowFlow() { return lowFlow; } public void setLowFlow(Long lowFlow) { this.lowFlow = lowFlow; } public Long getUpFlow() { return upFlow; } public void setUpFlow(Long upFlow) { this.upFlow = upFlow; } public Long getTotalFlow() { return totalFlow; } public void setTotalFlow(Long totalFlow) { this.totalFlow = totalFlow; } //定义比较方法 @Override public int compareTo(FlowCount o) { if(this.equals(o)){ return 0; } //使用总流量比较 return o.getTotalFlow().compareTo(this.getTotalFlow()); } @Override public void write(DataOutput out) throws IOException { out.writeLong(this.lowFlow); out.writeLong(this.upFlow); } @Override public void readFields(DataInput in) throws IOException { this.lowFlow = in.readLong(); this.upFlow = in.readLong(); this.totalFlow = this.lowFlow + this.upFlow; } @Override public String toString() { return lowFlow + "\t" + upFlow + "\t" + totalFlow; } }
定义Mapper 1 2 3 4 5 6 7 8 9 10 11 12 13 14 15 16 17 18 19 20 21 22 23 public class SortFlowMapper extends Mapper<LongWritable, Text,FlowCount,Text> { private Text phoneNum = new Text(); private static final Logger logger = LoggerFactory.getLogger(SortFlowMapper.class); @Override protected void map(LongWritable key, Text value, Context context) throws IOException, InterruptedException { String line = value.toString(); logger.info("map== line [{}]",line); if(StringUtils.isNotBlank(line)){ String[] split = line.split("\\s+"); if(split.length > 3){ phoneNum.set(split[1]); FlowCount flowCount = new FlowCount(); flowCount.setUpFlow(Long.valueOf(split[split.length - 2])); flowCount.setLowFlow(Long.valueOf(split[split.length - 3])); context.write(flowCount,phoneNum); } } } }
在map阶段,将数据转成 flowCount 为key 手机号为值的格式,以为需要根据flowCount的信息排序
定义分区逻辑 1 2 3 4 5 6 7 8 9 10 11 public class SortPartition extends Partitioner<FlowCount, Text> { @Override public int getPartition(FlowCount flowCount, Text text, int i) { String substring = text.toString().substring(text.toString().length()-1); return Integer.valueOf(substring) % 2; } }
reduce 逻辑 1 2 3 4 5 6 7 8 9 10 public class SortFlowReducer extends Reducer<FlowCount, Text,Text, FlowCount> { @Override protected void reduce(FlowCount key, Iterable<Text> values, Context context) throws IOException, InterruptedException { for (Text value : values) { context.write(value,key); } } }
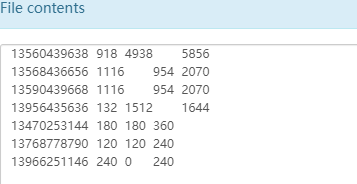
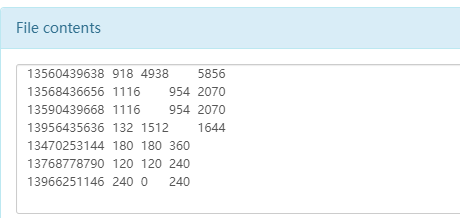
最终可以获取到各个分区的文件内进行排序的数据;
Combiner 合并操作 Combiner 是一个可选的组件,是独立于map 和reduce之外的。
map阶段每个mapTask 处理各自块的数据,reduce阶段需要将整个分区的数据都加载过来进行计算。
那么有些数据的计算是可以在map阶段提前完成一部分以达到减轻reduce的计算量。
比如 workCount 操作,在map阶段 提前将自身处理的数据完成reduce操作,对应reduce结果是没有影响的时候,是可以添加combiner 提高处理的效率。
Combiner 本质上其实就是Reducer ,所以如果业务能够做Reducer 操作,只需要添加对应的Combiner类即可
1 2 //指定CombinerClass 就是Reduce类即可 job.setCombinerClass(WorkCountMapReduce.class);
MapTask 工作机制
Read阶段:MapTask通过InputFormat获得的RecordReader,从输入InputSplit中解析出一个个key/value。 Map阶段:该节点主要是将解析出的key/value交给用户编写map()函数处理,并产生一系列新的key/value。 Collect收集阶段:在用户编写map()函数中,当数据处理完成后,一般会调用OutputCollector.collect()输出结果。在该函数内部,它会将生成的key/value分区(调用Partitioner),并写入一个环形内存缓冲区中。 Spill阶段:即“溢写”,当环形缓冲区满后,MapReduce会将数据写到本地磁盘上,生成一个临时文件。需要注意的是,将数据写入本地磁盘之前,先要对数据进行一次本地排序,并在必要时对数据进行合并、压缩等操作。 ReduceTask 工作机制
Copy阶段:ReduceTask从各个MapTask上远程拷贝一片数据,并针对某一片数据,如果其大小超过一定阈值,则写到磁盘上,否则直接放到内存中。 Merge阶段:在远程拷贝数据的同时,ReduceTask启动了两个后台线程对内存和磁盘上的文件进行合并,以防止内存使用过多或磁盘上文件过多。 Sort阶段:按照MapReduce语义,用户编写reduce()函数输入数据是按key进行聚集的一组数据。为了将key相同的数据聚在一起,Hadoop采用了基于排序的策略。由于各个MapTask已经实现对自己的处理结果进行了局部排序,因此,ReduceTask只需对所有数据进行一次归并排序即可。 Reduce阶段:reduce()函数将计算结果写到HDFS上。 reduceTask 如果等于0 ,表示没有reduce阶段,输出的是map节点的结果,和maptask数量相等。
OutPutFormat 是决定最终数据的结果输出格式的组件。
默认的实现类 是 TextOutputFormat 文本文件的输出的格式。
SequenceFileOutputFormat 的输出格式 可以方便的作为下一个mapreduce的输入结果,以为它的输出结构比较紧凑。
通过定义自定义的OutPutFormat 可以将数据的结果输出到数据库中如mysql es 等。也可以自定义输出的格式和内容。
此抽象类中有3个方法
//获取记录的写入器质性数据的写入
getRecordWriter(TaskAttemptContext context ) //用于检查输出信息,检查是否已经被输出过了,防止结果被覆盖,比如FileOutPutFormat 中会检查目录是否已经存在
checkOutputSpecs(JobContext job ) //此方法获取一个OutputCommitter 实例
下面通过自定义OutPutFormat将数据输出到指定文件中
可以自定义向指定的新路径中写入文件的方法,这里向随机路径中写入数据
1 2 3 4 5 6 7 8 9 10 11 12 13 14 15 16 17 18 19 20 21 22 23 24 25 26 27 28 29 30 31 32 33 34 35 36 37 38 39 40 public class CustomOutPutFormat extends FileOutputFormat<Text, IntWritable> { public CustomOutPutFormat() { super(); } @Override public RecordWriter<Text, IntWritable> getRecordWriter(TaskAttemptContext job) throws IOException, InterruptedException { Configuration configuration = job.getConfiguration(); FileSystem fileSystem = FileSystem.get(configuration); String randomPath = UUID.randomUUID().toString(); fileSystem.mkdirs(new Path("/"+randomPath)); FSDataOutputStream fsDataOutputStream = fileSystem.create(new Path("/" + randomPath + "/" + randomPath)); CustomRecordWriter customRecordWriter = new CustomRecordWriter(fsDataOutputStream); return customRecordWriter; } static class CustomRecordWriter<Text, IntWritable> extends RecordWriter<Text, IntWritable>{ private FSDataOutputStream fsDataOutputStream; public CustomRecordWriter(FSDataOutputStream fsDataOutputStream) { this.fsDataOutputStream = fsDataOutputStream; } @Override public void write(Text key, IntWritable value) throws IOException, InterruptedException { fsDataOutputStream.write(key.toString().getBytes(StandardCharsets.UTF_8)); fsDataOutputStream.write("\n".getBytes(StandardCharsets.UTF_8)); } @Override public void close(TaskAttemptContext context) throws IOException, InterruptedException { IOUtils.closeStream(fsDataOutputStream); } } }
在Driver中指定要使用的outPutForamt即可
1 2 job.setOutputFormatClass(CustomOutPutFormat.class);
注意:即使在OutputFormat中定义了输出的结果路径,在执行命令的时候依然需要指定一个目标路径,因为最终的执行结果 _SUCCESS 文件需要写到目标路径中。
Join 操作 在处理数据的过程中,可能涉及到多个输入文件的关联操作.那么就需要在处理的时候根据特定的规则,对多个文件的数据执行关联处理.
示例数据:
order 信息
1 2 3 4 5 6 7 1001 01 1 1002 02 2 1003 03 3 1004 01 4 1005 02 5 1006 03 6
product 商品信息
目标输出 将order的id输出为名称;
那么就需要执行数据关联操作;
通过Reduce中进行关联操作 (reduce join) 根据数据的ID作为key ,将同一个id的数据放到同一个reduce中,在reduce中完成数据的组装操作;
定义 value的数据格式
1 2 3 4 5 6 7 8 9 10 11 12 13 14 15 16 17 18 19 20 21 22 23 24 25 26 27 28 29 30 31 32 33 34 35 36 37 38 39 40 41 42 43 44 45 46 47 48 49 50 51 52 53 54 55 56 57 58 59 60 61 62 63 64 65 66 67 68 69 70 71 72 73 74 75 76 77 public class TableInfo implements Writable { private String tableName; private String orderId; private Integer productNum; private String productName; public String getTableName() { return tableName; } public void setTableName(String tableName) { this.tableName = tableName; } public String getOrderId() { return orderId; } public void setOrderId(String orderId) { this.orderId = orderId; } public Integer getProductNum() { return productNum; } public void setProductNum(Integer productNum) { this.productNum = productNum; } public String getProductName() { return productName; } public void setProductName(String productName) { this.productName = productName; } @Override public void write(DataOutput out) throws IOException { out.writeUTF(tableName); if("order".equals(tableName)){ out.writeUTF(orderId); out.writeInt(productNum); }else{ out.writeUTF(productName); } } @Override public void readFields(DataInput in) throws IOException { tableName = in.readUTF(); if("order".equals(tableName)){ orderId = in.readUTF(); productNum = in.readInt(); }else{ productName = in.readUTF(); } } @Override public String toString() { return "TableInfo{" + "tableName='" + tableName + '\'' + ", orderId='" + orderId + '\'' + ", productNum=" + productNum + ", productName='" + productName + '\'' + '}'; }
mapper 方法中从content中根据读取的文件名确定数据的类型
1 2 3 4 5 6 7 8 9 10 11 12 13 14 15 16 17 18 19 20 21 22 23 24 25 26 27 28 29 30 31 32 33 34 35 36 37 38 39 40 41 42 43 44 public class Join1Mapper extends Mapper<LongWritable, Text,Text,TableInfo> { private static final Logger logger = LoggerFactory.getLogger(Join1Mapper.class); private Text textKey = new Text(); private String tableName; @Override protected void setup(Context context) throws IOException, InterruptedException { //从inputSplit 中获取文件名称 FileSplit fileSplit = (FileSplit)context.getInputSplit(); Path path = fileSplit.getPath(); tableName = path.getName(); if(tableName.indexOf("order") > -1){ tableName = "order"; }else{ tableName = "product"; } } @Override protected void map(LongWritable key, Text value, Context context) throws IOException, InterruptedException { String[] splits = value.toString().split("\\s+"); TableInfo tableInfo = new TableInfo(); tableInfo.setTableName(tableName); //根据不同的表结果设置不同的值 if("order".equals(tableName)){ tableInfo.setOrderId(splits[0]); tableInfo.setProductNum(Integer.valueOf(splits[2])); textKey.set(splits[1]); }else{ textKey.set(splits[0]); tableInfo.setProductName(splits[1]); } context.write(textKey,tableInfo); } }
reducer 中处理数据的关联和输出
1 2 3 4 5 6 7 8 9 10 11 12 13 14 15 16 17 18 19 20 21 22 23 24 25 26 27 28 29 30 31 32 33 34 35 36 37 38 public class Join1Reduce extends Reducer<Text, TableInfo,Text, NullWritable> { private static final Logger logger = LoggerFactory.getLogger(Join1Reduce.class); private Text outTextKey = new Text(); @Override protected void reduce(Text key, Iterable<TableInfo> values, Context context) throws IOException, InterruptedException { Iterator<TableInfo> iterator = values.iterator(); List<TableInfo> orderList = new ArrayList<>(); String productName = ""; while (iterator.hasNext()){ TableInfo tableInfo = iterator.next(); logger.info("tableInfo = [{}]",tableInfo); if("order".equals(tableInfo.getTableName())){ TableInfo tempOrderInfo = new TableInfo(); try { //注意此参数顺序 BeanUtils.copyProperties(tempOrderInfo,tableInfo); orderList.add(tempOrderInfo); } catch (IllegalAccessException e) { e.printStackTrace(); } catch (InvocationTargetException e) { e.printStackTrace(); } }else{ productName = tableInfo.getProductName(); } } logger.info("orderList = [{}]",orderList); for (TableInfo tableInfo : orderList) { outTextKey.set(tableInfo.getOrderId() + "\t" + productName + "\t" + tableInfo.getProductNum()); context.write(outTextKey,NullWritable.get()); } } }
在Map阶段利用缓存处理关联操作 (map join) 在Reduce 阶段处理关联操作,Reduce阶段的处理压力比较大,并且容易在Reduce阶段产生数据倾斜。
如果一个表的数据量很小,一个表的数据量很大,那么完全可以直接将小表的数据一次性加载到内存中,在map阶段就完成数据的替换操作.
1 2 3 4 5 6 7 8 9 10 11 12 13 14 15 16 17 18 19 20 21 22 23 24 25 26 27 28 29 30 31 32 33 34 35 36 37 38 39 public class Join2Mapper extends Mapper<LongWritable, Text,Text, NullWritable> { private static final Logger logger = LoggerFactory.getLogger(Join2Mapper.class); private Text textKey = new Text(); private Map<String,String> productMapCache = new HashMap<>(); @Override protected void setup(Context context) throws IOException, InterruptedException { URI[] cacheFiles = context.getCacheFiles(); URI cacheFile = cacheFiles[0]; FileSystem fileSystem = FileSystem.get(context.getConfiguration()); FSDataInputStream inputStream = fileSystem.open(new Path(cacheFile.getPath())); BufferedReader bufferedReader = new BufferedReader(new InputStreamReader(inputStream,"utf-8")); String line = null; while ((line = bufferedReader.readLine()) != null){ String[] split = line.split("\\s+"); productMapCache.put(split[0],split[1]); } } @Override protected void map(LongWritable key, Text value, Context context) throws IOException, InterruptedException { String[] splits = value.toString().split("\\s+"); StringBuilder writerLine = new StringBuilder(); writerLine.append(splits[0]); writerLine.append("\t"); writerLine.append(productMapCache.get(splits[1])); writerLine.append("\t"); writerLine.append(splits[2]); textKey.set(writerLine.toString()); context.write(textKey,NullWritable.get()); } }
1 2 3 4 5 6 7 8 9 10 11 12 13 14 15 16 17 18 19 20 21 22 23 24 25 26 27 28 29 30 31 32 33 34 35 public class Join2Driver { public static void main(String[] args) throws IOException, InterruptedException, ClassNotFoundException, URISyntaxException { Configuration configuration = new Configuration(); Job job = Job.getInstance(configuration); job.setJarByClass(Join2Driver.class); job.setMapperClass(Join2Mapper.class); job.setMapOutputKeyClass(Text.class); job.setMapOutputValueClass(NullWritable.class); job.setOutputKeyClass(Text.class); job.setOutputValueClass(NullWritable.class); //mapjoin 不需要reduce job.setNumReduceTasks(0); //添加缓存路径 URI cacheUri = new URI("hdfs://hadoop1:9820/cache_product/product.txt"); job.setCacheFiles(new URI[]{cacheUri}); FileInputFormat.setInputPaths(job,new Path(args[0])); FileOutputFormat.setOutputPath(job,new Path(args[1])); boolean ret = job.waitForCompletion(true); System.exit(ret ? 0 : 1); } }
hadoop 数据压缩 为什么要压缩?
对数据执行压缩可以减少磁盘的占用空间。减少磁盘IO。
什么使用用?
如果任务是IO密集型的任务,采用压缩可以减少磁盘的压力,可以采用压缩。
目前MR支持的压缩算法
压缩格式 Hadoop自带? 算法 文件扩展名 是否可切片 换成压缩格式后,原来的程序是否需要修改
优点:压缩率比较高;
Bzip2压缩
Lzo压缩
Snappy压缩
压缩的时候要考虑解压缩速度和存储量,压缩率 是否支持分片。
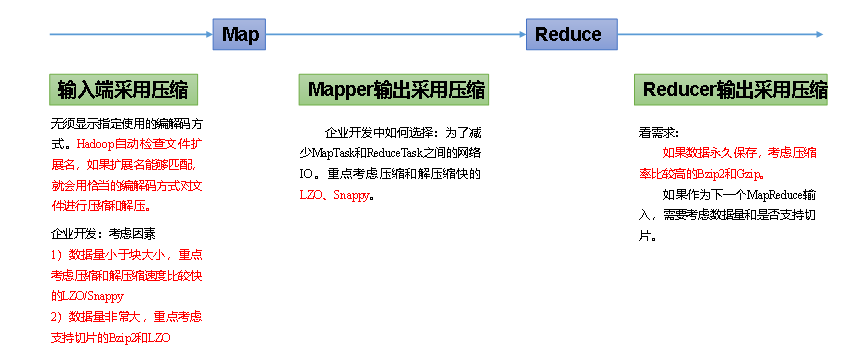
压缩的选择 压缩算法的选择应该结合数据量的大小,使用的位置综合来决定。
可以在3个地方配置数据压缩
如何配置压缩 对于每种压缩算法,hadoop内部有对应的编解码器。
DEFLATE org.apache.hadoop.io.compress.DefaultCodec
gzip org.apache.hadoop.io.compress.GzipCodec
bzip2 org.apache.hadoop.io.compress.BZip2Codec
LZO com.hadoop.compression.lzo.LzopCodec
Snappy org.apache.hadoop.io.compress.SnappyCodec
输入阶段的压缩配置
输入阶段不建议配置,通过文件的后缀自动匹配压缩算法
mapper 输出的配置
mapred-site.xml 中配置参数
key: mapreduce.map.output.compress value: 默认值是false 修改为true ,表示开启
key: mapreduce.map.output.compress.codec value: org.apache.hadoop.io.compress.DefaultCodec 配置编解码器
reducer 输出的配置
mapred-site.xml 中配置参数
key: mapreduce.output.fileoutputformat.compress vlaue: 默认是false,改为true开启
代码指定本次任务的编解码 指定map输出的编码
指定reduce 输出的编码
FileOutputFormat.setCompressOutput(job,true);
1 2 3 4 5 6 7 8 9 10 11 12 13 14 15 16 17 18 19 20 21 22 23 24 25 26 27 28 29 30 31 Configuration configuration = new Configuration(); //执行输出的压缩开启 configuration.setBoolean("mapreduce.map.output.compress",true); //使用Bip2Codec configuration.setClass("mapreduce.map.output.compress.codec", BZip2Codec.class, CompressionCodec.class); Job job = Job.getInstance(configuration); job.setJarByClass(Compress1Driver.class); job.setMapperClass(Compress1Mapper.class); job.setReducerClass(Compress1Reduce.class); job.setMapOutputKeyClass(Text.class); job.setMapOutputValueClass(IntWritable.class); job.setOutputKeyClass(Text.class); job.setOutputValueClass(IntWritable.class); //设置reduce 输出的压缩,内部其实也是设置了 参数 mapreduce.output.fileoutputformat.compress FileOutputFormat.setCompressOutput(job,true); FileOutputFormat.setOutputCompressorClass(job, BZip2Codec.class); FileInputFormat.setInputPaths(job,new Path(args[0])); FileOutputFormat.setOutputPath(job,new Path(args[1])); boolean ret = job.waitForCompletion(true); System.exit(ret ? 0 : 1);
最终的执行结果日志中,可以看到已经使用了对应的压缩算法
map 阶段
reduce 阶段