spring security oauth2 服务

通过springSecurity Oauth2 相关的配置,可以很方便的搭建一个授权服务器,完成颁发令牌和访问控制等功能,也可以搭建一个资源服务器 以springsecurity 来管理资源的访问控制。

这里演示如何搭建授权服务器和资源服务器(这里放到一个项目中)

注意: oauth2 相关的核心包目前已经迁移到springsecurity 中内置了;

https://zhuanlan.zhihu.com/p/342883010 (参考链接)

基础入门环境

  1. 首先引入对应的依赖

    spring-security-oauth2 已经被废弃,不建议使用此类,直接使用spring-security 内部的一些配置就可完成.

    要作为资源服务器 使用 spring-boot-starter-oauth2-resource-server

    而要作为授权服务器,未来将又另一个项目来支持

    https://github.com/spring-projects/spring-authorization-server

    所以目前要使用授权服务器的功能,只能还用废弃的 spring-cloud-starter-oauth2(内部未标注废弃) 或 spring-security-oauth2

    1
    2
    3
    4
    5
    6
    7

    <parent>
    <groupId>org.springframework.boot</groupId>
    <artifactId>spring-boot-starter-parent</artifactId>
    <version>2.3.10.RELEASE</version>
    <relativePath/> <!-- lookup parent from repository -->
    </parent>

           <dependency>
                 <groupId>org.springframework.boot</groupId>
                 <artifactId>spring-boot-starter-oauth2-resource-server</artifactId>
             </dependency>
     
             <dependency>
                 <groupId>org.springframework.boot</groupId>
                 <artifactId>spring-boot-starter-oauth2-client</artifactId>
             </dependency>
     
             <dependency>
                 <groupId>org.springframework.cloud</groupId>
                 <artifactId>spring-cloud-starter-oauth2</artifactId>
                 <version>2.2.5.RELEASE</version>
             </dependency>
     
             <dependency>
                 <groupId>org.springframework.boot</groupId>
                 <artifactId>spring-boot-starter-security</artifactId>
             </dependency>
     
             <dependency>
                 <groupId>org.springframework.boot</groupId>
                 <artifactId>spring-boot-starter-web</artifactId>
             </dependency>
               <dependency>
                 <groupId>org.springframework.boot</groupId>
                 <artifactId>spring-boot-starter-test</artifactId>
                 <scope>test</scope>
             </dependency>
             <dependency>
                 <groupId>org.springframework.security</groupId>
                 <artifactId>spring-security-test</artifactId>
                 <scope>test</scope>
             </dependency>
    
    1. 配置springSecurity 基本配置

      主要配置基本的登录授权

    1
    2
    3
    4
    5
    6
    7
    8
    9
    10
    11
    12
    13
    14
    15
    16
    17
    18
    19
    20
    21
    22
    23
    24
    25
    26
    27
    28
    29
    30
    31
    32
    33
    34
    35
    36
    37
    @EnableGlobalMethodSecurity(prePostEnabled = true)
    @EnableWebSecurity(debug = true)
    public class WebSecurityConfig extends WebSecurityConfigurerAdapter {

    @Bean
    public PasswordEncoder passwordEncoder(){
    return new BCryptPasswordEncoder();
    }

    @Override
    public void configure(WebSecurity web) throws Exception {
    super.configure(web);
    }

    @Bean
    public UserDetailsService userDetailsService() {
    UserDetails userDetails = User.builder().username("admin").password(passwordEncoder().encode("111111")).roles("SYSTEM").build();
    InMemoryUserDetailsManager manager = new InMemoryUserDetailsManager();
    manager.createUser(userDetails);
    return manager;
    }

    @Override
    protected void configure(HttpSecurity http) throws Exception {
    http.authorizeRequests().antMatchers("/oauth/**").permitAll().anyRequest().authenticated().
    and().formLogin().permitAll().and().csrf().disable();
    }

    @Bean
    @Override
    public AuthenticationManager authenticationManagerBean() throws Exception {
    return super.authenticationManagerBean();
    }

    }


  2. 配置资源服务器

EnableResourceServer 核心注解

定义那些资源是受资源服务器包含 可以用来被授权的资源;

新建controller ,提供 一个读取用户 一个写入用户的URi

@RestController
@RequestMapping("/user")
public class UserController {

public static UserInfo userInfo = null;

static {
    userInfo = new UserInfo();
    userInfo.setUserId("1");
    userInfo.setUserName("user");
    userInfo.setSex("男");
}

@RequestMapping("/getUserInfo")
public UserInfo getUserInfo(){
    return userInfo;
}

@RequestMapping("/updateUserInfo")
public String updateUserInfo(UserInfo userInfo){
    UserController.userInfo = userInfo;
    return "true";
}

}
1
2
3
4
5
6
7
8
9
10
11
12
13
14
15
@Configuration
@EnableResourceServer
public class ResourceServiceConfig extends ResourceServerConfigurerAdapter {
//配置资源的权限
@Override
public void configure(HttpSecurity http) throws Exception {
http.authorizeRequests()
.antMatchers("/user/getUserInfo").access("#oauth2.hasScope('user:read')")
.antMatchers("/user/updateUserInfo").access("#oauth2.hasScope('user:write')")

.anyRequest().authenticated().and().requestMatchers().antMatchers("/user/**");
}

}

在此配置中表示 /user/** 的是资源路径;
/user/getUserInfo 访问必须授权oauth2 的user:read 权限
/user/updateUserInfo 访问必须授权oauth2 的user:write 权限

注意必须是: requestMatchers() 节点配置的才是资源 authorizeRequests() 节点的不是

配置关键点:

  • @EnableResourceServer 开启授权服务 并且配置类继承 ResourceServerConfigurerAdapter
  1. 配置授权服务器

EnableAuthorizationServer 核心注解

1
2
3
4
5
6
7
8
9
10
11
12
13
14
15
16
17
18
19
20
21
22
23
24
25
@EnableAuthorizationServer
@Configuration
public class AuthServiceConfig extends AuthorizationServerConfigurerAdapter {
@Autowired
private PasswordEncoder passwordEncoder;

@Override
public void configure(ClientDetailsServiceConfigurer clientDetails) throws Exception {
//从内存中获取
clientDetails.inMemory()
.withClient("1")
.secret(passwordEncoder.encode("12345"))
//访问token失效时间
.accessTokenValiditySeconds(300)
//刷新token失效时间
.refreshTokenValiditySeconds(3000)
//授权类型
.authorizedGrantTypes("authorization_code","implicit","password","client_credentials","refresh_token")
//重定向路径
.redirectUris("http://www.baidu.com")
//可申请的scope
.scopes("all","user:read","user:write");
}
}

配置关键点:

  • @EnableAuthorizationServer 开启授权服务 并且配置类继承 AuthorizationServerConfigurerAdapter
  • clientDetails.inMemory() 基于内存的配置,目前只演示最基本的

授权测试

处理授权请求端点: /oauth/authorize
response_type=code 授权码
response_type=implicit 简化模式
response_type=password 简化模式
response_type=client_credentials 简化模式

client_id 客户端id

redirect_uri=http://www.baidu.com 重定向链接

​ scope=all 权限范围

code 换取 accessToken 端点 /oauth/token

​ 示例请求:授权码获取access_token

​ /oauth/token?code=g73kkS&grant_type=authorization_code&redirect_uri=http://www.baidu.com&client_id=client&client_secret=123123

​ 示例请求:刷新token(注意:目前的配置还不支持刷新token,后面会说明如何配置支持刷新token)

   /oauth/token?grant_type=refresh_token&client_id=client&client_secret=123123&refresh_token=[refresh_token]

授权码模式

  1. 页面访问此路径申请 user:read 权限
    http://localhost:8081/oauth/authorize?response_type=code&client_id=1&redirect_uri=http://www.baidu.com&scope=user:read

    1. 出现登录页面登录后授权

    确定授权

    1. 返回到 重定向uri 并且携带code

    https://www.baidu.com/?code=1RKQ98

  1. 使用code 发送post 请求去交换accessToken

     请求时增加Basic Auth请求信息 username = client_id ,Password = client_secret
    
     ![](https://image-1304078208.cos.ap-beijing.myqcloud.com//img/20220309233809.png)
    
     ![]( https://image-1304078208.cos.ap-beijing.myqcloud.com/img/20220311160946.png)


    1. 使用获取到的access_token 可以去请求资源服务器的 /user/getUserInfo 接口

      ![]( https://image-1304078208.cos.ap-beijing.myqcloud.com/img/20220310111929.png)
      
      获取无权限的  /user/updateUserInfo 接口,显示没有权限访问
      
      ![]( https://image-1304078208.cos.ap-beijing.myqcloud.com/img/20220310112104.png)
      

简化模式

  1. 通过url 访问获取权限,通过设置 response_type = token 表示使用简化模式直接返回token信息

    http://localhost:8081/oauth/authorize?response_type=token&client_id=1&redirect_uri=http://www.baidu.com&scope=user:read

    1. 最终在返回的uri 上返回对应的信息

    https://www.baidu.com/#access_token=b41dc384-4aab-4051-8fba-677cb9baa748&token_type=bearer&expires_in=300

密码模式

  1. 通过设置 grant_type = password 指定使用密码模式

    http://localhost:8081/oauth/token?username=admin&password=12345&grant_type=password&client_id=1&client_secret=12345&scope=user:read

    请求提示信息: GET 请求不允许此操作;

      {"error":"method_not_allowed","error_description":"Request method &#39;GET&#39; not supported"}
    
  2. 使用postman 发送结果提示

    1
    2
    3
    4
    {            "error": "unsupported_grant_type",
    "error_description": "Unsupported grant type: password"
    }

    这是因为密码模式相当于是用户名密码进行校验,需要将AuthenticationManager 配置到授权服务器,能够使用AuthenticationManager来校验用户名和密码

    增加配置:

​ 3. 再次请求,返回信息

                {
                            "access_token": "ab36422e-0e8c-4d87-9255-02b359ce580b",
                            "token_type": "bearer",
                            "refresh_token": "b43409c4-a06e-472f-847c-5deb00fc25bf",
                            "expires_in": 299,
                            "scope": "user:read"
        			}			

​ -

客户端模式

  1. 客户端模式,通过 grant_type=client_credentials 来指定授权类型

    http://localhost:8081/oauth/token?grant_type=client_credentials&client_id=1&client_secret=12345&scope=user:read
    

token刷新

access_token 当失效的时候,将无法访问,需要通过fresh_token 执行刷新;

/oauth/token?grant_type=refresh_token&client_id=client&client_secret=123123&refresh_token=[refresh_token]

执行token刷新,显示内部错误

增加配置

  • reuseRefreshTokens 表示是否在刷新的时候保留刷新token不变
  • userDetailsService 刷新时需要对用户信息进行校验

关键的类或接口

AuthenticationManager 用来查询用户信息
TokenStore 生成token 查询token
默认的实现是 InMemoryTokenStore 是放到内存中管理的,内部有许多的map

AccessTokenConverter 转换access_token的格式,可以替换为 JWT或其他自定义格式

jdbc支持

上面的演示中的客户端的信息,比如 client-id client-secret 等信息都是使用内存的方式;在真实环境下是无法满足需求的,需要通过数据库能够集中管理
并且多个授权服务器能够共享数据;

  1. 初始化数据库脚本

去此路径下找数据库脚本

https://github.com/spring-projects/spring-security-oauth/tree/2.4.x/spring-security-oauth2/src/test/resources

注意:默认给的sql 是 h2 的sql,这里最了修改,将LONGVARBINARY 改成了blob

1
2
3
4
5
6
7
8
9
10
11
12
13
14
15
16
17
18
19
20
21
22
23
24
25
26
27
28
29
30
31
32
33
34
35
36
37
38
39
40
41
42
43
44
45
46
47
48
49
50
51
52
53
54
55
56
57
58
59
60
61
62
63
64
65
66
67
68
69


create table oauth_client_details (
client_id VARCHAR(256) PRIMARY KEY,
resource_ids VARCHAR(256),
client_secret VARCHAR(256),
scope VARCHAR(256),
authorized_grant_types VARCHAR(256),
web_server_redirect_uri VARCHAR(256),
authorities VARCHAR(256),
access_token_validity INTEGER,
refresh_token_validity INTEGER,
additional_information VARCHAR(4096),
autoapprove VARCHAR(256)
);

create table oauth_client_token (
token_id VARCHAR(256),
token blob,
authentication_id VARCHAR(256) PRIMARY KEY,
user_name VARCHAR(256),
client_id VARCHAR(256)
);

create table oauth_access_token (
token_id VARCHAR(256),
token blob,
authentication_id VARCHAR(256) PRIMARY KEY,
user_name VARCHAR(256),
client_id VARCHAR(256),
authentication blob,
refresh_token VARCHAR(256)
);

create table oauth_refresh_token (
token_id VARCHAR(256),
token blob,
authentication blob
);

create table oauth_code (
code VARCHAR(256), authentication blob
);

create table oauth_approvals (
userId VARCHAR(256),
clientId VARCHAR(256),
scope VARCHAR(256),
status VARCHAR(10),
expiresAt TIMESTAMP,
lastModifiedAt TIMESTAMP
);


-- customized oauth_client_details table
create table ClientDetails (
appId VARCHAR(256) PRIMARY KEY,
resourceIds VARCHAR(256),
appSecret VARCHAR(256),
scope VARCHAR(256),
grantTypes VARCHAR(256),
redirectUrl VARCHAR(256),
authorities VARCHAR(256),
access_token_validity INTEGER,
refresh_token_validity INTEGER,
additionalInformation VARCHAR(4096),
autoApproveScopes VARCHAR(256)
);

sql执行完毕后,数据库中 初始化了这几个表;

jdbc存储oauth2 客户端的信息

这里用到的数据库表只有 oauth_client_details

用来存储客户端的注册和授权相关信息;

修改配置。指定使用jdbc的方式,指定datasource 和 密码编码器;

注意:数据库依赖和配置请自行添加;

1
2
3
4
5
6
7
@Override
public void configure(ClientDetailsServiceConfigurer clientDetails) throws Exception {
//从内存中获取
clientDetails.jdbc(dataSource).passwordEncoder(passwordEncoder);

}

插入测试数据,也就是之前配置到内存的数据输入到数据表中;

注意:client_secret 加密后存储.多值字段逗号分割

1
2
3
INSERT INTO `db`.`oauth_client_details`(`client_id`, `resource_ids`, `client_secret`, `scope`, `authorized_grant_types`, `web_server_redirect_uri`, `authorities`, `access_token_validity`, `refresh_token_validity`, `additional_information`, `autoapprove`) VALUES ('1', '1', '$2a$10$6ZKgLpB0/LjurxogBrQ1/uC7evTGTS76jsJNRTc/z2psPlo.dD2Wq', 'all,user:read,user:write', 'authorization_code,implicit,password,client_credentials,refresh_token', 'http://www.baidu.com', NULL, 300, 500, NULL, 'user:read');


测试:
(注意数据库配置了user:read 自动授权无需确认 )
http://localhost:8081/oauth/authorize?response_type=code&client_id=1&redirect_uri=http://www.baidu.com&scope=user:read

jdbc存储token 信息

添加配置token存储方式为jdbc

操作授权流程查看数据库

jdbc 存储Approval 信息

Approval 信息既每个用户的允许授权的信息,相关的接口是 org.springframework.security.oauth2.provider.approval.ApprovalStore

存储一个允许记录 ,删除允许记录 或获取某个用户的;

默认的实现是 InMemoryApprovalStore 都在内存中存储;

可以配置成在数据库存储的方式;

相关的数据库表是 oauth_approvals

添加配置

1
2
3
4
5
6
7
8
9
10

@Bean
public ApprovalStore jdbcApprovalStore(){
return new JdbcApprovalStore(dataSource);
}


//在端口这里设置jdbc 的存储
endpoints.approvalStore(jdbcApprovalStore())

在页面操作允许或拒绝后,就可以在其中看到记录.默认有效期是一个月

ApprovalStore

redis存储token

  1. 添加redis的依赖

    1
    2
    3
    4
    5
    <dependency>
    <groupId>org.springframework.boot</groupId>
    <artifactId>spring‐boot‐starter‐data‐redis</artifactId>
    </dependency>

  2. 配置使用RedisTokenStore

  3. 发起授权请求后查询redis中的信息

jwt支持

  1. 引入springsecurity jwt的依赖

    1
    2
    3
    4
    5
    <dependency>
    <groupId>org.springframework.security</groupId>
    <artifactId>spring-security-jwt</artifactId>
    <version>1.0.10.RELEASE</version>
    </dependency>
  2. 配置使用jwtTokenStore 和 JwtAccessTokenConverter

    1
    2
    3
    4
    5
    6
    7
    8
    9
    10
    11
    12
    @Bean
    public JwtAccessTokenConverter jwtAccessTokenConverter(){
    JwtAccessTokenConverter jwtAccessTokenConverter = new JwtAccessTokenConverter();
    jwtAccessTokenConverter.setSigningKey("1");
    return jwtAccessTokenConverter;
    }


    @Bean
    public TokenStore jwtTokenStore(){
    return new JwtTokenStore(jwtAccessTokenConverter());
    }
  3. 增加token增强剂,可以对token返回的信息进行增强

    1
    2
    3
    4
    5
    6
    7
    8
    9
    10
    11
    12
    13
    @Component
    public class JwtTokenEnhancer implements TokenEnhancer {


    @Override
    public OAuth2AccessToken enhance(OAuth2AccessToken accessToken, OAuth2Authentication authentication) {
    Map<String, Object> info = new HashMap<>();
    info.put("key","value");
    ((DefaultOAuth2AccessToken)accessToken).setAdditionalInformation(info);
    return accessToken;
    }
    }

  4. 将tokenstore 和增强剂配置到端点

    1
    2
    3
    4
    5
    6
    7
    8
    9
    10
    11
    12
    13
    14
    15
    16
    17
    18
    19
    20
    21
    @Override
    public void configure(AuthorizationServerEndpointsConfigurer endpoints) throws Exception {
    //配置token 处理链
    TokenEnhancerChain enhancerChain = new TokenEnhancerChain();

    List<TokenEnhancer> delegates = new ArrayList<>();
    delegates.add(jwtAccessTokenConverter());
    delegates.add(jwtTokenEnhancer);
    enhancerChain.setTokenEnhancers(delegates);

    endpoints.authenticationManager(authenticationManager)
    .allowedTokenEndpointRequestMethods(HttpMethod.GET,HttpMethod.POST)
    .reuseRefreshTokens(false)
    .userDetailsService(userDetailsService)
    .tokenStore(jwtTokenStore())
    //token 增强剂
    .tokenEnhancer(enhancerChain)
    ;

    }

​ 增加剂这里使用 TokenEnhancerChain 可以多层拓展token的返回信息;

  1. 获取授权信息 ,返回了jwt 格式的access_token 信息。同时返回的json中包含了增强的信息;

自定义授权页面

自带的授权页面实在无法满足我们的需求,所以需要自定义授权的页面;

  1. 引入模板引擎依赖
1
2
3
4
5
6
7

<dependency>
<groupId>org.springframework.boot</groupId>
<artifactId>spring-boot-starter-thymeleaf</artifactId>
</dependency>


  1. 添加自定义的请求controller
1
2
3
4
5
6
7
8
9
10
11
12
13
14
15
16
17
18
19
20
21
22
23
24
25
26
27
28
29
30
31
32


@Controller
@RequestMapping("/myAuth")
@SessionAttributes("authorizationRequest")
public class AuthController {


//跳转到授权页面
@RequestMapping("/confirm_access")
public ModelAndView authorize(Map<String, Object> model,HttpServletRequest request){
AuthorizationRequest authorizationRequest = (AuthorizationRequest) model.get("authorizationRequest");
List<Map<String,Object>> scopeList = new ArrayList<>();
if (model.containsKey("scopes") || request.getAttribute("scopes") != null) {
Map<String, String> scopes = (Map<String, String>) (model.containsKey("scopes") ?
model.get("scopes") : request.getAttribute("scopes"));
for (String scope : scopes.keySet()) {
Map<String,Object> scopeInfo = new HashMap<>();
scopeInfo.put("code",scope);
scopeInfo.put("value",scopes.get(scope));
scopeList.add(scopeInfo);
}
}
ModelAndView modelAndView = new ModelAndView();
modelAndView.addObject("authorizationRequest",authorizationRequest);
modelAndView.addObject("scopeList",scopeList);
modelAndView.setViewName("confirm");
return modelAndView;
}
}


注意:1. @SessionAttributes 必须要加 2. 获取的scopes 信息是从approvalsotre 中获取了是否允许的值

  1. 编写自定义页面
1
2
3
4
5
6
7
8
9
10
11
12
13
14
15
16
17
18
19
20
21
22
23

<!DOCTYPE html>
<html xmlns:th="http://www.thymeleaf.org">
<html lang="en">
<head>
<meta charset="UTF-8">
<title>授权</title>
</head>
<body>
<form action="/oauth/authorize" method="post">
<p>
<h3 th:text="${authorizationRequest.clientId}+' 请求获取授权信息'"></h3>
</p>
<input type="hidden" name="user_oauth_approval" value="true">
<div th:each="scope:${scopeList}">
<span th:text="scope.code+'是否允许授权'"></span>
<input type="radio" th:name="${scope.code}" value="true" th:checked="${scope.value}" checked="false"/>
</div>
<button type="submit" class="btn">提交</button>
</form>
</body>
</html>

本页面只是简单的演示;

  1. 配置使其能够使用自定义的跳转授权页面

默认的路径是 /oauth/confirm_access 映射成自定义的路径

源码分析

一些关键的处理类

  • AbstractEndpoint 抽象的端点类,AuthorizationEndpoint 和 TokenEndpoint 是其子类

  • AuthorizationEndpoint 处理用户的授权请求和处理用户的允许和拒绝授权逻辑
    内部端点 /oauth/authorize

  • TokenEndpoint 处理用户请求token 获取access_token 的逻辑
    内部端点 /oauth/token

  • WhitelabelApprovalEndpoint 显示默认的批准页面的处理和生成逻辑,我们在自定义批准页面的时候可以查看此类的逻辑
    内部端点 /oauth/confirm_access

  • WhitelabelErrorEndpoint 认证 错误的页面处理
    内部端点 /oauth/error

  • CheckTokenEndpoint 检查token的端点
    内部端点 /oauth/check_token

AuthorizationEndpoint (授权请求逻辑)

基本说明

需要注意的是这个类中有2个 /oauth/authorize 请求端点;

但是有个区别第一个是 @RequestMapping(value = “/oauth/authorize”)
第二个是 @RequestMapping(value = “/oauth/authorize”, method = RequestMethod.POST, params = OAuth2Utils.USER_OAUTH_APPROVAL)

第一个是处理用户的允许授权请求
第二个是跳转到允许页面,页面的提交请求,用户允许页面有一个参数为 OAuth2Utils.USER_OAUTH_APPROVAL ,所以在我们自定义页面的时候也必须有这个参数才行;

处理用户允许授权请求

1
2
3
4
5
6
7
8
9
10
11
12
13
14
15
16
17
18
19
20
21
22
23
24
25
26
27
28
29
30
31
32
33
34
35
36
37
38
39
40
41
42
43
44
45
46
47
48
49
50
51
52
53
54
55
56
57
58
59
60
61
62
63
64
65
66
67
68
69
70
71
72
73
74
75
76
77
78
79
80
81
82
83
84
85
86
87
88
89
90
91
92
93
94
95
96
97
98

@RequestMapping(value = "/oauth/authorize")
public ModelAndView authorize(Map<String, Object> model, @RequestParam Map<String, String> parameters,
SessionStatus sessionStatus, Principal principal) {

// Pull out the authorization request first, using the OAuth2RequestFactory. All further logic should
// query off of the authorization request instead of referring back to the parameters map. The contents of the
// parameters map will be stored without change in the AuthorizationRequest object once it is created.

//将请求参数封装成AuthorizationRequest 对象 这个 getOAuth2RequestFactory 获取的是 DefaultOAuth2RequestFactory
AuthorizationRequest authorizationRequest = getOAuth2RequestFactory().createAuthorizationRequest(parameters);

//返回类型
Set<String> responseTypes = authorizationRequest.getResponseTypes();

//必要的参数校验
if (!responseTypes.contains("token") && !responseTypes.contains("code")) {
throw new UnsupportedResponseTypeException("Unsupported response types: " + responseTypes);
}

if (authorizationRequest.getClientId() == null) {
throw new InvalidClientException("A client id must be provided");
}

try {

//判断是否登录,必须要登录
if (!(principal instanceof Authentication) || !((Authentication) principal).isAuthenticated()) {
throw new InsufficientAuthenticationException(
"User must be authenticated with Spring Security before authorization can be completed.");
}

//获取clientDetailsService 具体实现跟配置的有关系,目前使用的是jdbc 从数据库中根据clientId 查询
ClientDetails client = getClientDetailsService().loadClientByClientId(authorizationRequest.getClientId());


String redirectUriParameter = authorizationRequest.getRequestParameters().get(OAuth2Utils.REDIRECT_URI);
//获取uri参数比对是否是存储的重定向url一致
String resolvedRedirect = redirectResolver.resolveRedirect(redirectUriParameter, client);
if (!StringUtils.hasText(resolvedRedirect)) {
throw new RedirectMismatchException(
"A redirectUri must be either supplied or preconfigured in the ClientDetails");
}
authorizationRequest.setRedirectUri(resolvedRedirect);

// We intentionally only validate the parameters requested by the client (ignoring any data that may have
// been added to the request by the manager).

//校验请求的 scope 是否clientdetail中包含 具体可查看 DefaultOAuth2RequestValidator#validateScope
oauth2RequestValidator.validateScope(authorizationRequest, client);

// Some systems may allow for approval decisions to be remembered or approved by default. Check for
// such logic here, and set the approved flag on the authorization request accordingly.


//处理用户的允许处理 内部用到了approvalStore 从中查询上次对于权限是否允许
authorizationRequest = userApprovalHandler.checkForPreApproval(authorizationRequest,
(Authentication) principal);


// TODO: is this call necessary?

//检查当前是否是允许的
boolean approved = userApprovalHandler.isApproved(authorizationRequest, (Authentication) principal);
authorizationRequest.setApproved(approved);

// Validation is all done, so we can check for auto approval...
if (authorizationRequest.isApproved()) {
//如果是返回token的
if (responseTypes.contains("token")) {
return getImplicitGrantResponse(authorizationRequest);
}
//如果是返回code 并且是允许的
if (responseTypes.contains("code")) {
return new ModelAndView(getAuthorizationCodeResponse(authorizationRequest,
(Authentication) principal));
}
}

// Store authorizationRequest AND an immutable Map of authorizationRequest in session
// which will be used to validate against in approveOrDeny()

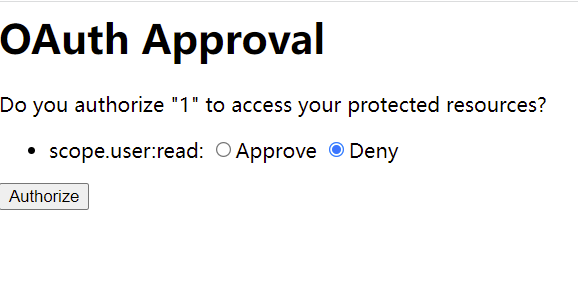
//将请求的一些信息放到 model 中 model 会被放到session中 因为此类上有@SessionAttributes 注解
model.put(AUTHORIZATION_REQUEST_ATTR_NAME, authorizationRequest);
model.put(ORIGINAL_AUTHORIZATION_REQUEST_ATTR_NAME, unmodifiableMap(authorizationRequest));
//跳转到用户确认页面
return getUserApprovalPageResponse(model, authorizationRequest, (Authentication) principal);

}
catch (RuntimeException e) {
sessionStatus.setComplete();
throw e;
}

}


ApprovalStoreUserApprovalHandler#checkForPreApproval

1
2
3
4
5
6
7
8
9
10
11
12
13
14
15
16
17
18
19
20
21
22
23
24
25
26
27
28
29
30
31
32
33
34
35
36
37
38
39
40
41
42
43
44
45
46
47
48
49
50
51
52
53
54
55
56
57
58
59
60
61
62
63
64
65
66
67
68
69
70
71
72
73
74
75
76
77
78
79
80
81
82
83
84
85
86


public AuthorizationRequest checkForPreApproval(AuthorizationRequest authorizationRequest,
Authentication userAuthentication) {

String clientId = authorizationRequest.getClientId();
Collection<String> requestedScopes = authorizationRequest.getScope();
Set<String> approvedScopes = new HashSet<String>();
Set<String> validUserApprovedScopes = new HashSet<String>();

if (clientDetailsService != null) {
try {
ClientDetails client = clientDetailsService.loadClientByClientId(clientId);
for (String scope : requestedScopes) {
if (client.isAutoApprove(scope)) {
approvedScopes.add(scope);
}
}

//处理ClientDetails 里面的一个列自动授权逻辑


if (approvedScopes.containsAll(requestedScopes)) {
// gh-877 - if all scopes are auto approved, approvals still need to be added to the approval store.
Set<Approval> approvals = new HashSet<Approval>();
Date expiry = computeExpiry();
for (String approvedScope : approvedScopes) {
approvals.add(new Approval(userAuthentication.getName(), authorizationRequest.getClientId(),
approvedScope, expiry, ApprovalStatus.APPROVED));
}
approvalStore.addApprovals(approvals);

authorizationRequest.setApproved(true);

//当当前申请的权限都支持自动授权的时候返回
return authorizationRequest;
}
}
catch (ClientRegistrationException e) {
logger.warn("Client registration problem prevent autoapproval check for client=" + clientId);
}
}

if (logger.isDebugEnabled()) {
StringBuilder builder = new StringBuilder("Looking up user approved authorizations for ");
builder.append("client_id=" + clientId);
builder.append(" and username=" + userAuthentication.getName());
logger.debug(builder.toString());
}

// Find the stored approvals for that user and client

//clientDetail 中不是全部允许提交后,从approvalStore 中获取之前的允许或拒接信息
Collection<Approval> userApprovals = approvalStore.getApprovals(userAuthentication.getName(), clientId);

// Look at the scopes and see if they have expired
Date today = new Date();
for (Approval approval : userApprovals) {
if (approval.getExpiresAt().after(today)) {
if (approval.getStatus() == ApprovalStatus.APPROVED) {
validUserApprovedScopes.add(approval.getScope());
approvedScopes.add(approval.getScope());
}
}
}

if (logger.isDebugEnabled()) {
logger.debug("Valid user approved/denied scopes are " + validUserApprovedScopes);
}

//如果之前的都是允许并且还没有失效,(每个允许的存储也是有时效的)那么就是允许的

// If the requested scopes have already been acted upon by the user,
// this request is approved
if (validUserApprovedScopes.containsAll(requestedScopes)) {
approvedScopes.retainAll(requestedScopes);
// Set only the scopes that have been approved by the user
authorizationRequest.setScope(approvedScopes);
authorizationRequest.setApproved(true);
}

return authorizationRequest;

}


隐式模式的处理返回getImplicitGrantResponse(authorizationRequest)

1
2
3
4
5
6
7
8
9
10
11
12
13
14
15
16
17
18
19
20
21
22
23


private ModelAndView getImplicitGrantResponse(AuthorizationRequest authorizationRequest) {
try {
//封装请求
TokenRequest tokenRequest = getOAuth2RequestFactory().createTokenRequest(authorizationRequest, "implicit");
OAuth2Request storedOAuth2Request = getOAuth2RequestFactory().createOAuth2Request(authorizationRequest);

//获取token 最终回调用 tokenServices.createAccessToken
OAuth2AccessToken accessToken = getAccessTokenForImplicitGrant(tokenRequest, storedOAuth2Request);
if (accessToken == null) {
throw new UnsupportedResponseTypeException("Unsupported response type: token");
}
return new ModelAndView(new RedirectView(appendAccessToken(authorizationRequest, accessToken), false, true,
false));
}
catch (OAuth2Exception e) {
return new ModelAndView(new RedirectView(getUnsuccessfulRedirect(authorizationRequest, e, true), false,
true, false));
}
}


默认允许的授权码模式处理 new ModelAndView(getAuthorizationCodeResponse(authorizationRequest,

                              (Authentication) principal));
1
2
3
4
5
6
7
8
9
10
11
12

private View getAuthorizationCodeResponse(AuthorizationRequest authorizationRequest, Authentication authUser) {
try {
//直接生成code 码并且 重定向到 重定向地址
return new RedirectView(getSuccessfulRedirect(authorizationRequest,
generateCode(authorizationRequest, authUser)), false, true, false);
}
catch (OAuth2Exception e) {
return new RedirectView(getUnsuccessfulRedirect(authorizationRequest, e, false), false, true, false);
}
}

用户允许页面的请求 getUserApprovalPageResponse

userApprovalHandler 可以自定义设置,有3种实现,

DefaultUserApprovalHandler
ApprovalStoreUserApprovalHandler
TokenStoreUserApprovalHandler

当不执行自定义设置的时候;会根据approvalStore 或tokenStore 来选择使用那种

见配置类(AuthorizationServerEndpointsConfigurer)的源码,这里不再赘述

1
2
3
4
5
6
7
8
9
10
11
12
13
14
15

// private String userApprovalPage = "forward:/oauth/confirm_access"; 重定向到默认的确认页面

private ModelAndView getUserApprovalPageResponse(Map<String, Object> model,
AuthorizationRequest authorizationRequest, Authentication principal) {
if (logger.isDebugEnabled()) {
logger.debug("Loading user approval page: " + userApprovalPage);
}

//UserApprovalHandler 有多种实现
model.putAll(userApprovalHandler.getUserApprovalRequest(authorizationRequest, principal));
return new ModelAndView(userApprovalPage, model);
}


userApprovalHandler.getUserApprovalRequest(authorizationRequest, principal)
目前的实现是 ApprovalStoreUserApprovalHandler

1
2
3
4
5
6
7
8
9
10
11
12
13
14
15
16
17
18
19
20
21
22
23
24
25
 
//这里的主要逻辑是将 approvalStore 存储的允许信息读取出来,最终返回给了scopes 属性,这也就是自定义页面的时候 从 请求或model中获取的信息;

//需要注意的是如果不指定 approvalStore 而用了tokenStore 会获取不到scopes 因为TokenStoreUserApprovalHandler 中的实现完全不同;
@Override
public Map<String, Object> getUserApprovalRequest(AuthorizationRequest authorizationRequest,
Authentication userAuthentication) {
Map<String, Object> model = new HashMap<String, Object>();
model.putAll(authorizationRequest.getRequestParameters());
Map<String, String> scopes = new LinkedHashMap<String, String>();
for (String scope : authorizationRequest.getScope()) {
scopes.put(scopePrefix + scope, "false");
}
for (Approval approval : approvalStore.getApprovals(userAuthentication.getName(),
authorizationRequest.getClientId())) {
if (authorizationRequest.getScope().contains(approval.getScope())) {
scopes.put(scopePrefix + approval.getScope(),
approval.getStatus() == ApprovalStatus.APPROVED ? "true" : "false");
}
}
model.put("scopes", scopes);
return model;
}


内置授权页面逻辑

对应的类为 WhitelabelApprovalEndpoint#getAccessConfirmation

基本的逻辑就是一个普通的控制器方法,并且做了一些值的判断用java 拼接了一个内置页面模板,当我们自定义页面的时候可以参考此逻辑;

核心方法是:createTemplate

提交地址为:/oauth/authorize method="post"> 并且 包含一个 user_oauth_approval 标签

处理授权请求

再次回到 AuthorizationEndpoint 不过是下面的那个方法

1
2
3
4
5
6
7
8
9
10
11
12
13
14
15
16
17
18
19
20
21
22
23
24
25
26
27
28
29
30
31
32
33
34
35
36
37
38
39
40
41
42
43
44
45
46
47
48
49
50
51
52
53
54
55
56
57
58
59
60
61
62
63
64
65
66
67
68

@RequestMapping(value = "/oauth/authorize", method = RequestMethod.POST, params = OAuth2Utils.USER_OAUTH_APPROVAL)
public View approveOrDeny(@RequestParam Map<String, String> approvalParameters, Map<String, ?> model,
SessionStatus sessionStatus, Principal principal) {

if (!(principal instanceof Authentication)) {
sessionStatus.setComplete();
throw new InsufficientAuthenticationException(
"User must be authenticated with Spring Security before authorizing an access token.");
}


//session中获取对象
AuthorizationRequest authorizationRequest = (AuthorizationRequest) model.get(AUTHORIZATION_REQUEST_ATTR_NAME);

if (authorizationRequest == null) {
sessionStatus.setComplete();
throw new InvalidRequestException("Cannot approve uninitialized authorization request.");
}

// Check to ensure the Authorization Request was not modified during the user approval step
//检查是否被篡改信息
@SuppressWarnings("unchecked")
Map<String, Object> originalAuthorizationRequest = (Map<String, Object>) model.get(ORIGINAL_AUTHORIZATION_REQUEST_ATTR_NAME);
if (isAuthorizationRequestModified(authorizationRequest, originalAuthorizationRequest)) {
throw new InvalidRequestException("Changes were detected from the original authorization request.");
}

try {
Set<String> responseTypes = authorizationRequest.getResponseTypes();

authorizationRequest.setApprovalParameters(approvalParameters);
//userApprovalHandler 更新 允许信息 会更新 approvalStore 中存储的授权信息
authorizationRequest = userApprovalHandler.updateAfterApproval(authorizationRequest,
(Authentication) principal);


boolean approved = userApprovalHandler.isApproved(authorizationRequest, (Authentication) principal);
authorizationRequest.setApproved(approved);

if (authorizationRequest.getRedirectUri() == null) {
sessionStatus.setComplete();
throw new InvalidRequestException("Cannot approve request when no redirect URI is provided.");
}

//拒绝的逻辑
if (!authorizationRequest.isApproved()) {
return new RedirectView(getUnsuccessfulRedirect(authorizationRequest,
new UserDeniedAuthorizationException("User denied access"), responseTypes.contains("token")),
false, true, false);
}


if (responseTypes.contains("token")) {
//返回类型包含token 隐式模式的返回
return getImplicitGrantResponse(authorizationRequest).getView();
}
//授权码模式的返回
return getAuthorizationCodeResponse(authorizationRequest, (Authentication) principal);
}
finally {
sessionStatus.setComplete();
}

}


1
2
3
4
5
6
7
8
9
10
11
12
13

private View getAuthorizationCodeResponse(AuthorizationRequest authorizationRequest, Authentication authUser) {
try {
//重定向
return new RedirectView(getSuccessfulRedirect(authorizationRequest,
generateCode(authorizationRequest, authUser)), false, true, false);
}
catch (OAuth2Exception e) {
return new RedirectView(getUnsuccessfulRedirect(authorizationRequest, e, false), false, true, false);
}
}


生成 code generateCode 会调用 authorizationCodeServices.createAuthorizationCode(combinedAuth);
最终使用 RandomValueStringGenerator 生成

code 换access_token 逻辑

主要逻辑在 TokenEndpoint#postAccessToken

1
2
3
4
5
6
7
8
9
10
11
12
13
14
15
16
17
18
19
20
21
22
23
24
25
26
27
28
29
30
31
32
33
34
35
36
37
38
39
40
41
42
43
44
45
46
47
48
49
50
51
52
53
54
55
56
57
58
59
60
61
62
63
64
65
66

@RequestMapping(value = "/oauth/token", method=RequestMethod.POST)
public ResponseEntity<OAuth2AccessToken> postAccessToken(Principal principal, @RequestParam
Map<String, String> parameters) throws HttpRequestMethodNotSupportedException {


if (!(principal instanceof Authentication)) {
throw new InsufficientAuthenticationException(
"There is no client authentication. Try adding an appropriate authentication filter.");
}

String clientId = getClientId(principal);
ClientDetails authenticatedClient = getClientDetailsService().loadClientByClientId(clientId);
//封装token请请你
TokenRequest tokenRequest = getOAuth2RequestFactory().createTokenRequest(parameters, authenticatedClient);

//校验clientId
if (clientId != null && !clientId.equals("")) {
// Only validate the client details if a client authenticated during this
// request.
if (!clientId.equals(tokenRequest.getClientId())) {
// double check to make sure that the client ID in the token request is the same as that in the
// authenticated client
throw new InvalidClientException("Given client ID does not match authenticated client");
}
}
//校验scope
if (authenticatedClient != null) {
oAuth2RequestValidator.validateScope(tokenRequest, authenticatedClient);
}
if (!StringUtils.hasText(tokenRequest.getGrantType())) {
throw new InvalidRequestException("Missing grant type");
}

//不能是简化模式
if (tokenRequest.getGrantType().equals("implicit")) {
throw new InvalidGrantException("Implicit grant type not supported from token endpoint");
}

//授权码的请求
if (isAuthCodeRequest(parameters)) {
// The scope was requested or determined during the authorization step
if (!tokenRequest.getScope().isEmpty()) {
logger.debug("Clearing scope of incoming token request");
tokenRequest.setScope(Collections.<String> emptySet());
}
}

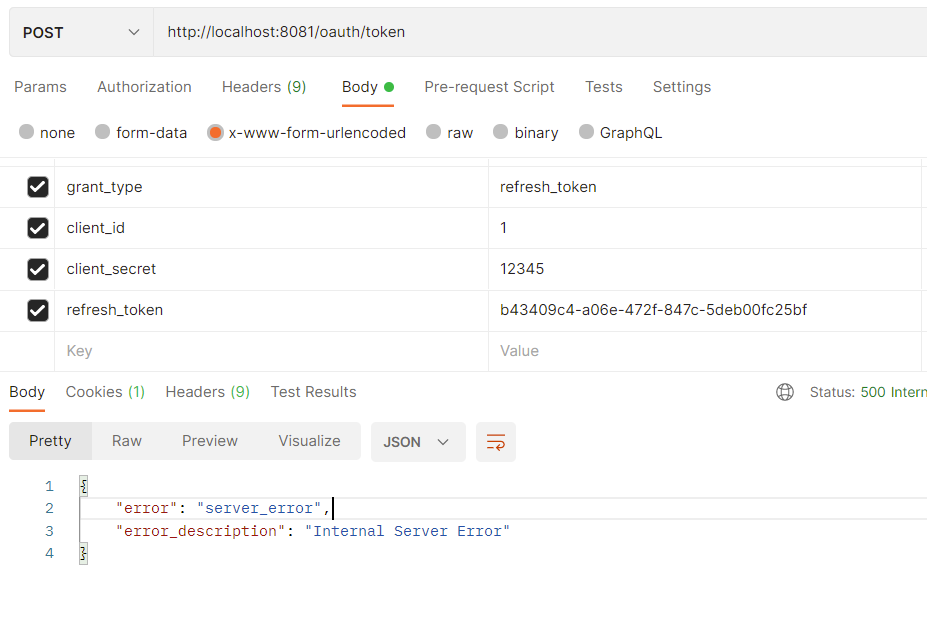
//是刷新token的请求
if (isRefreshTokenRequest(parameters)) {
// A refresh token has its own default scopes, so we should ignore any added by the factory here.
tokenRequest.setScope(OAuth2Utils.parseParameterList(parameters.get(OAuth2Utils.SCOPE)));
}

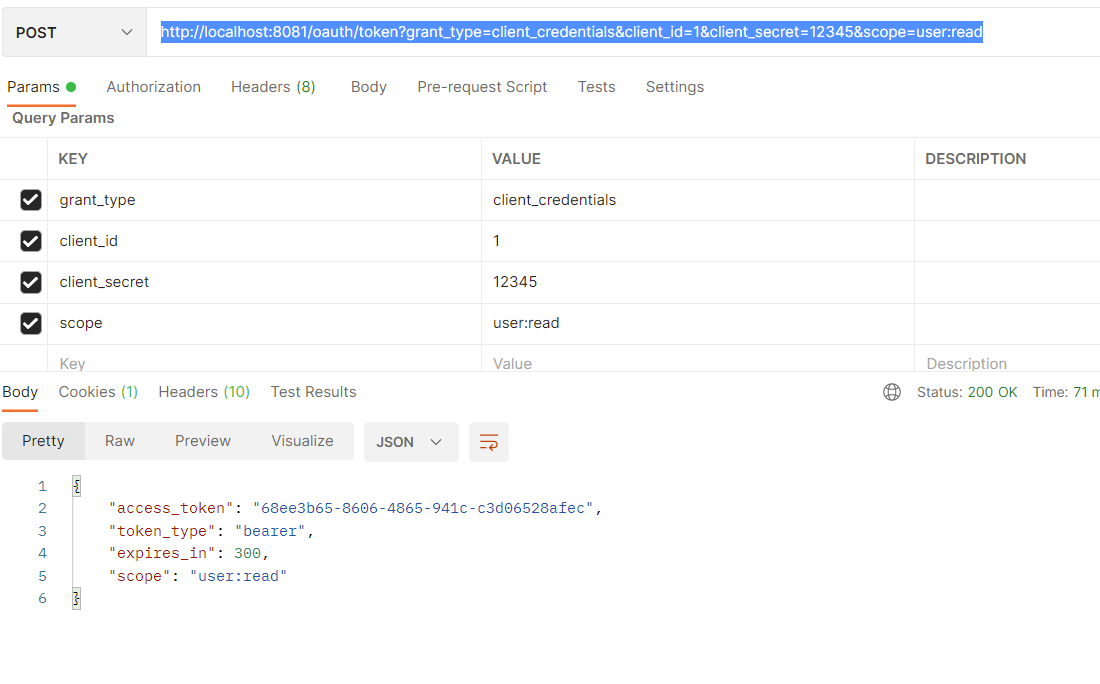
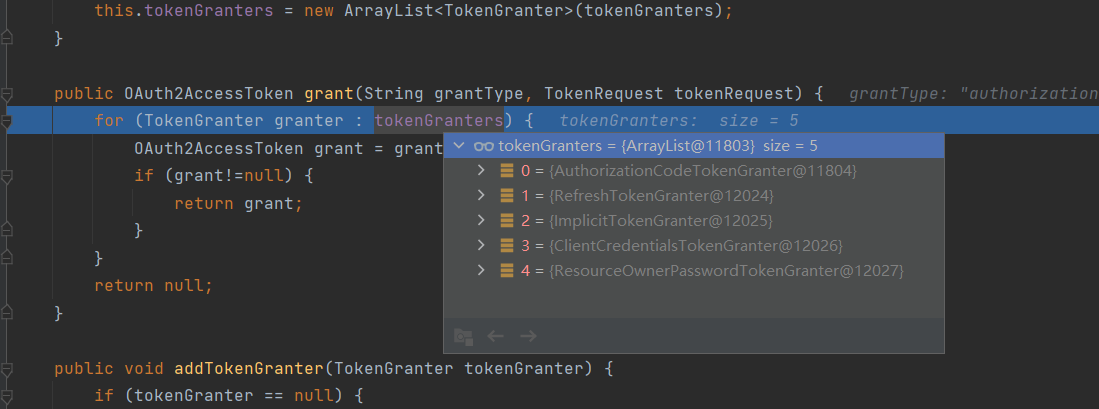
//调用token授权期执行授权方法
OAuth2AccessToken token = getTokenGranter().grant(tokenRequest.getGrantType(), tokenRequest);
if (token == null) {
throw new UnsupportedGrantTypeException("Unsupported grant type: " + tokenRequest.getGrantType());
}

return getResponse(token);

}


TokenGranter 是用来生成token的接口, 有多种实现

未设置的时候就是 AuthorizationServerEndpointsConfigurer#tokenGranter

1
2
3
4
5
6
7
8
9
10
11
12
13
14
15
16
17
private TokenGranter tokenGranter() {
if (tokenGranter == null) {
tokenGranter = new TokenGranter() {
private CompositeTokenGranter delegate;

@Override
public OAuth2AccessToken grant(String grantType, TokenRequest tokenRequest) {
if (delegate == null) {
delegate = new CompositeTokenGranter(getDefaultTokenGranters());
}
return delegate.grant(grantType, tokenRequest);
}
};
}
return tokenGranter;
}

最终调用的是 CompositeTokenGranter 组合token颁发器\

任何一个获取成功后就返回

调用

tokenServices.createAccessToken(getOAuth2Authentication(client, tokenRequest));

由 DefaultTokenServices 实现

1
2
3
4
5
6
7
8
9
10
11
12
13
14
15
16
17
18
19
20
21
22
23
24
25
26
27
28
29
30
31
32
33
34
35
36
37
38
39
40
41
42
43
44
45
46
47
48
49
50
51
52
53
54
55
56
57
@Transactional
public OAuth2AccessToken createAccessToken(OAuth2Authentication authentication) throws AuthenticationException {

OAuth2AccessToken existingAccessToken = tokenStore.getAccessToken(authentication);
OAuth2RefreshToken refreshToken = null;
if (existingAccessToken != null) {
if (existingAccessToken.isExpired()) {
if (existingAccessToken.getRefreshToken() != null) {
refreshToken = existingAccessToken.getRefreshToken();
// The token store could remove the refresh token when the
// access token is removed, but we want to
// be sure...
tokenStore.removeRefreshToken(refreshToken);
}
tokenStore.removeAccessToken(existingAccessToken);
}
else {
// Re-store the access token in case the authentication has changed
tokenStore.storeAccessToken(existingAccessToken, authentication);
return existingAccessToken;
}
}

// Only create a new refresh token if there wasn't an existing one
// associated with an expired access token.
// Clients might be holding existing refresh tokens, so we re-use it in
// the case that the old access token
// expired.

//没有刷新的
if (refreshToken == null) {
refreshToken = createRefreshToken(authentication);
}
// But the refresh token itself might need to be re-issued if it has
// expired.
else if (refreshToken instanceof ExpiringOAuth2RefreshToken) {
ExpiringOAuth2RefreshToken expiring = (ExpiringOAuth2RefreshToken) refreshToken;
if (System.currentTimeMillis() > expiring.getExpiration().getTime()) {
refreshToken = createRefreshToken(authentication);
}
}

//创建token
OAuth2AccessToken accessToken = createAccessToken(authentication, refreshToken);

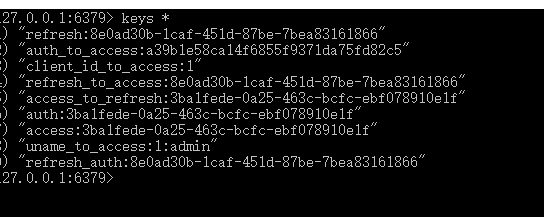
//存储token
tokenStore.storeAccessToken(accessToken, authentication);
// In case it was modified
refreshToken = accessToken.getRefreshToken();
if (refreshToken != null) {
tokenStore.storeRefreshToken(refreshToken, authentication);
}
return accessToken;

}


1
2
3
4
5
6
7
8
9
10
11
12
13
14
15
16
17


private OAuth2AccessToken createAccessToken(OAuth2Authentication authentication, OAuth2RefreshToken refreshToken) {
//默认的token
DefaultOAuth2AccessToken token = new DefaultOAuth2AccessToken(UUID.randomUUID().toString());
//获取一些时间
int validitySeconds = getAccessTokenValiditySeconds(authentication.getOAuth2Request());
if (validitySeconds > 0) {
token.setExpiration(new Date(System.currentTimeMillis() + (validitySeconds * 1000L)));
}
token.setRefreshToken(refreshToken);
token.setScope(authentication.getOAuth2Request().getScope());
//token增强器,我们拓展jwt的时候就是利用了这个增强器
return accessTokenEnhancer != null ? accessTokenEnhancer.enhance(token, authentication) : token;
}


==============================end===============================
至此oauth2 的相关就介绍完毕;