Spring Security(2)认证配置
前面只是简单使用了springsecurity的登录控制功能,当然实际使用中是一定需要写一些自定义配置的;本节将通过springsecurity配置一些功能:
- 通过数据库用户密码完成认证
- 使用自定义登录页面
- 实现记住我功能
- 增加验证码功能
添加配置类
配置的一个比较重要的类是 WebSecurityConfigurerAdapter
新建一个配置类去继承WebSecurityConfigurerAdapter,同时开启 @EnableWebSecurity
1 | @EnableWebSecurity |
主要做配置的就是实现这3个configure 方法;
1. 默认的AuthenticationManager 默认是获取的,而如果重写后那么将使用AuthenticationManagerBuilder 构建的AuthenticationManager ,此方法也可以用来配置认证用户信息;
1 | protected void configure(AuthenticationManagerBuilder auth) throws Exception { |
- 重写此方法配给制web安全相关的配置
1 | @Override |
- 重写此方法配置授权和认证相关的接口的信息
1 | @Override |
自定义登录时认证信息获取
springsecurity 提供了获取用户信息的一个重要接口 UserDetailsService
在登录的时候会调用此接口的
1 | //返回的信息是 UserDetails类 |
UserDetailsService 接口 框架默认也提供了多种实现
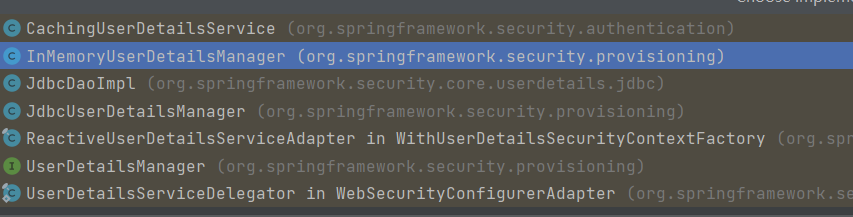
其中:
CachingUserDetailsService 通过装饰器模式装饰有缓存功能的service,内部维护了缓存
InMemoryUserDetailsManager 通过内存中获取用户信息的管理器
JdbcUserDetailsManager jdbc 通过jdbcTemplate 获取用户信息
基于内存的实现
使用@Bean声明一个 UserDetailsService 写在配置类中
1 | @Bean |
简单看下 InMemoryUserDetailsManager 的实现,其实就是在map 中维护了用户的信息;
在登录的时候从map中获取信息比对;根据上面的配置就可以同时使用2个不同角色的用户执行登录;
查询数据库
引入mybatis-plugs 和mysql驱动等相关jar包
1
2
3
4
5
6
7
8
9
10
11
12
13
<dependency>
<groupId>com.baomidou</groupId>
<artifactId>mybatis-plus-boot-starter</artifactId>
<version>3.4.3</version>
</dependency>
<dependency>
<groupId>mysql</groupId>
<artifactId>mysql-connector-java</artifactId>
<version>8.0.27</version>
</dependency>
添加数据库驱动配置
1
2
3
4
5
6
7
8
9
# DataSource Config
spring:
datasource:
driver-class-name: com.mysql.cj.jdbc.Driver
url: jdbc:mysql://localhost:3306/db?useUnicode=true&characterEncoding=utf8&serverTimezone=GMT
username: root
password: 111111实现自定义userdetailservice 及定义一个实现了UserDetails 接口的userdetail信息
1 | public class MyUserDetailService implements UserDetailsService { |
1 | @TableName(value = "t_user") |
1 |
|
1 | // UserDetailsService 的实现替换成自定义的类 |
PasswordEncoder
PasswordEncoder 是密码加密和解析的顶层接口;
encode 生成随机盐生成加密字符串
matches 密码是否匹配
并且提供了多种密码加解密实现,当然也可以自定义
登录操作的密码是密文保存的,所以需要定义加密实现类;
1 | //将此类声明到配置类中 |
通过工具类手动插入到数据库用户名和密码
1 | //生成密码插入数据库 |
测试登录,输入数据库中的用户名和密码可正常登录;
自定义登录页面
引入页面模板依赖
1
2
3
4<dependency>
<groupId>org.springframework.boot</groupId>
<artifactId>spring-boot-starter-thymeleaf</artifactId>
</dependency>添加配置文件
1
2
3
4
5
6
7
8
9string:
thymeleaf:
servlet:
content-type: text/html
cache: false
prefix: classpath:/templates/
suffix: .html
mode: HTML
encoding: UTF-8新增一个跳转到登录页面的方法和登录页面
1
2
3
4
5@RequestMapping("/login")
public String login(HttpServletRequest httpServletRequest){
return "login";
}1
2
3
4
5
6
7
8
9
10
11
12
13
14
15
16
17
18
19
20
21
22
23
24
25
26
27
28
29
30
31<!DOCTYPE html>
<html xmlns:th="http://www.thymeleaf.org">
<html lang="en">
<head>
<meta charset="UTF-8">
<title>登录</title>
</head>
<body>
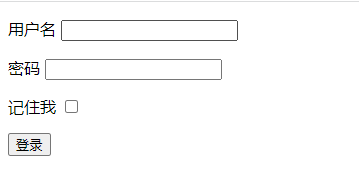
<form action="/doLogin" method="post">
<p th:if="${param.error != null}">
用户名和密码错误
</p>
<p th:if="${param.logout != null}">
退出登录
</p>
<p>
<label for="username">用户名</label>
<input type="text" id="username" name="username"/>
</p>
<p>
<label for="password">密码</label>
<input type="password" id="password" name="password"/>
</p>
<p>
<label for="password">记住我</label>
<input type="checkbox" id="rememberMe" name="rememberMe"/>
</p>
<button type="submit" class="btn">登录</button>
</form>
</body>
</html>配置登录页面相关配置
配置说明configure(HttpSecurity http) 配置认证授权的相关配置通过HttpSecurity 进行构建;
http 通过不同的方法获得不同的配置构造对象 再配置对应的子配置项。于xml的配置是等价的,可以看做是xml的 代码构造方法,每个and() 方法表示前一个配置项的结束,可以调用下一个方法配置下一个配置项。
http.authorizeRequests() 配置请求权限的配置
http.formLogin 配置表单登录的配置
http.logout 配置退出的配置
http.csrf 配置csrf的配置
其他就不一一列举了;
再此配置中我们定义了
- 表单登录的页面请求地址– loginPage
- 登录的处理url – loginProcessingUrl 表单提交登录请求提交到这个地址同时登录的url放开权限
- 用户名参数名 密码的参数名 成功后重定向的url
- 退出登录的url等
1
2
3
4
5
6
7
8
9
10
11
12
13@Override
protected void configure(HttpSecurity http) throws Exception {
http.authorizeRequests().anyRequest().authenticated()
.and().
formLogin()
.loginPage("/login").loginProcessingUrl("/doLogin").permitAll( .usernameParameter("username").passwordParameter("password").successForwardUrl("/index").and().csrf().disable()
.logout().logoutUrl("/logout").addLogoutHandler(new LogoutHandler() {
@Override
public void logout(HttpServletRequest request, HttpServletResponse response, Authentication authentication) {
}
});
}访问任何页面跳转到自定义登录页面,通过用户名和密码能完成登录
记住我功能
记住我是一个比较常见的一个功能,为的是能够一段时间不用总是输入用户名和密码而保持登录状态,springsecurity 也提供了很好的支持。
当开启了记住我功能后,并且登录页面的记住我 对应的一个参数 remember-me (默认参数) 是true的时候,会将 用户名 + 过期事件 + 密码 得到一个散列值写到cookie 上,在访问的时候即使是未登录的状态但是remember-me 的cookie 还未过期,就从cookie中获取到信息完成自动登录
生成cookie 的加密方式
1 | base64(username + ":" + expirationTime + ":" + |
需要注意的是这个key 是随机生成的,那么当重启机器或请求打到别的机器可能自动登录就失效了,所以这个key应该是固定的。可以在配置的时候指定;
配置rememberme
添加rememberme 配置
1 | .and() |
开启rememberMe 同时指定固定的加密的key
还可以添加其他自定义的操作
| 配置方法名 | 说明 |
|---|---|
| rememberMeCookieDomain | cookie 域名 |
| alwaysRemember | 总是触发 |
| rememberMeCookieName | cookie的名称,默认是 remember-me |
| rememberMeParameter | 标题提交参数的名称提交true 或false ,默认名称是 remember-me |
| useSecureCookie | 是否只在https 的时候开启 |
| userDetailsService | 当rememberme 失效的时候,指定userDetailsService 来查找用户信息,不配置的时候使用 HttpSecurity 默认的定义的userDetailsService |
还是其他的设置这里就不一一说明了;
表单中添加rememberMe 参数;
1 | <p> |
已勾选记住我执行登录后可以看到浏览器上已经被写入remember-me 的cookie;
验证码功能
这里通过验证码举例来收买如何拓展其他登录校验逻辑;相信明白了验证码功能的校验的逻辑,登录的其他信息比如手机验证码也是同样的道理;
引入生成验证码的类库,为了方便引入hutool 工具包
1
2
3
4
5<dependency>
<groupId>cn.hutool</groupId>
<artifactId>hutool-all</artifactId>
<version>5.7.21</version>
</dependency>登录页面中放入一个简陋的验证码
进入页面的时候将随机验证码生成数据传给页面,code值放入session中。真实环境可以考虑放入分布式缓存中。
1
2
3
4
5
6
7
8
9
10
11
12
13
14
15
@RequestMapping("/login")
public String login(HttpServletRequest httpServletRequest, Model model){
HttpSession session = httpServletRequest.getSession();
//验证码
ShearCaptcha captcha = CaptchaUtil.createShearCaptcha(100, 50, 4, 4);
RandomGenerator randomGenerator = new RandomGenerator("0123456789", 4);
captcha.setGenerator(randomGenerator);
captcha.createCode();
String code = captcha.getCode();
model.addAttribute("captcha",captcha.getImageBase64Data());
session.setAttribute("captchaCode",code);
return "login";
}1
2
3
4
5
6
7
8
9
10
11
12
13
14
15
16
17
18
19
20
21
22
23
24
25
26
27
28
29
30
31
32
33
34
35
36//页面代码
<!DOCTYPE html>
<html xmlns:th="http://www.thymeleaf.org">
<html lang="en">
<head>
<meta charset="UTF-8">
<title>登录</title>
</head>
<body>
<form action="/doLogin" method="post">
<p th:if="${param.error != null}">
登录错误
</p>
<p>
<label for="username">用户名</label>
<input type="text" id="username" name="username"/>
</p>
<p>
<label for="password">密码</label>
<input type="password" id="password" name="password"/>
</p>
<p>
<img th:src="${captcha}">
</p>
<p>
<label for="password">验证码</label>
<input type="text" id="captcha" name="captcha"/>
</p>
<p>
    <label for="password">记住我</label>
    <input type="checkbox" id="rememberMe" name="remember-me"/>
 </p>
<button type="submit" class="btn">登录</button>
</form>
</body>
</html>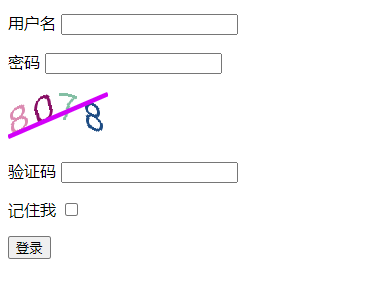
现在要做的是在校验用户名和密码之外 增加一个校验验证码的逻辑;
在登录执行的时候会将用户名和密码信息包装成一个 UsernamePasswordAuthenticationToken
最终通过 DaoAuthenticationProvider#additionalAuthenticationChecks 方法来校验密码是否正确;
我们现在通过拓展AuthenticationProvider 的additionalAuthenticationChecks 方式实现校验验证码。
不过需要拓展 UsernamePasswordAuthenticationToken 携带更多的信息,因为默认只携带了用户名和密码。
UsernamePasswordAuthenticationToken 有个details 属性。我们通过拓展这个details。
默认的 这details 是 WebAuthenticationDetails
新建一个类 继承 WebAuthenticationDetails
直接将HttpServletRequest 携带上,当然也可以自定义其他的属性,这里为了简单方便
1 | public class MyAuthenticationDetails extends WebAuthenticationDetails { |
//定义一个自定的detailsSouce 登录的时候会调用
1 | @Component |
实现自定义的 AuthenticationProvider
1 |
|
添加配置信息
完整配置如下
MyAuthenticationDetailsSource 需要设置到http.forlogin.authenticationDetailsSource
AuthenticationProvider 需要先声明 然后设置到 AuthenticationManagerBuilder 中
1 | @EnableWebSecurity |
至此就完成了自定义验证码校验的功能;
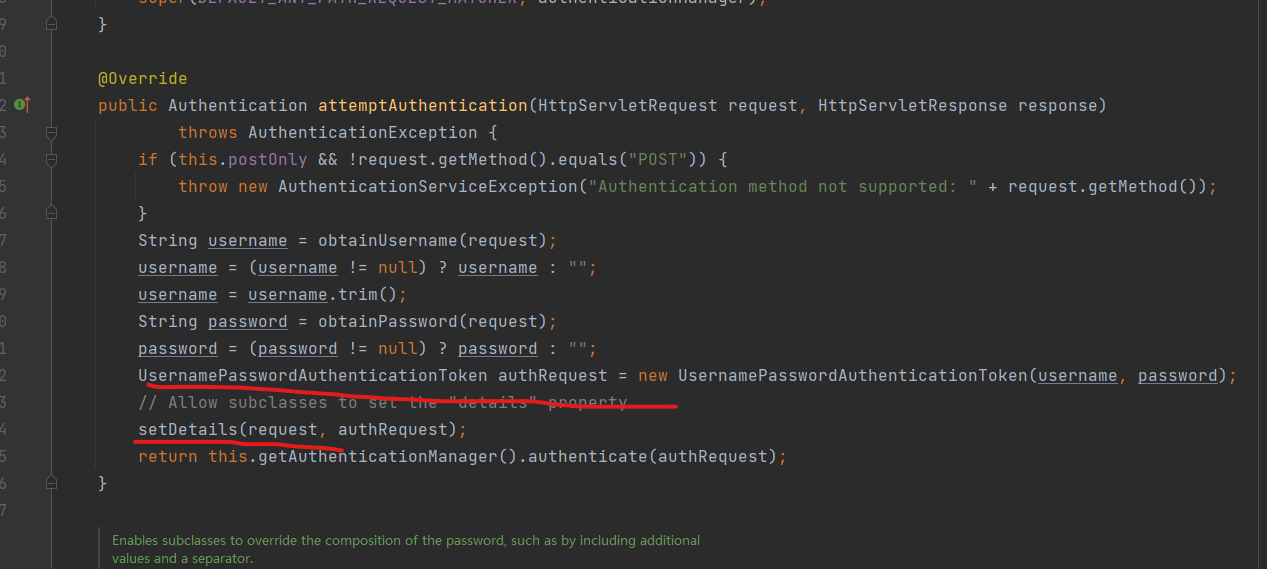
UsernamePasswordAuthenticationFilter 的处理登录方法中,包装usernametoken后,设置details
会调用 authenticationDetailsSource 去构建details,这里做了拓展;
而验证的时候会通过 ProviderManager 管理的AuthenticationProvider 这里是 DaoAuthenticationProvider 做了拓展;
详细可查看下一节登录源码分析流程;
json返回登录结果
如果通过ajax 请求登录和需要返回json格式的返回结果
可以借助springsecurity 提供针对表单登录的 successHandler 和 successHandler 做拓展;
假设希望登录成功后期望返回 {code :”200”,”msg”,”登录成功”}
//部分配置代码
1 | .successHandler(new AuthenticationSuccessHandler(){ |
1 | //写json到response |
如果通过ajax请求错误将返回结果
1 | { |