
shardingjdbc(四)选择分片算法
本篇将通过小例子的方式来一个一个的说明内置的分片算法;
内置多种分片算法以满足不同的业务场景;
自动分片算法
内置了一些常见场景的分片算法,只需要简单配置一些属性就可以实现分片
取模分片算法
顾名思义就是通过数据取模来分片,只需要指定分片算法类型和分片的数量,就会自动根据分片键的数据 % 分片的数量 完成分片
分片算法只需要指定类型,和配置一个几个分片的属性即可
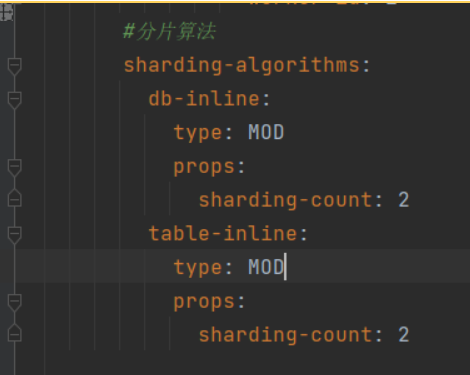
完整配置如下
1 | spring: |
哈希取模分片算法
说白了就是在取模算法的基础上加了一层 hash运算 然后再取模;
主要的特点是 可以针对非数值类型字段作为分片键;
如果分片键不是数值类型是不能取模的;这里假设order 表增加一个字符串的类型字段;
同时给数据库各个表增进此字段;
1 | alter table t_order_0 add city varchar(20); |
这里用一个库来做演示,因为分库和分表的分片算法是一样的
假设需求同一个城市的数据落到一个库中;
配置信息
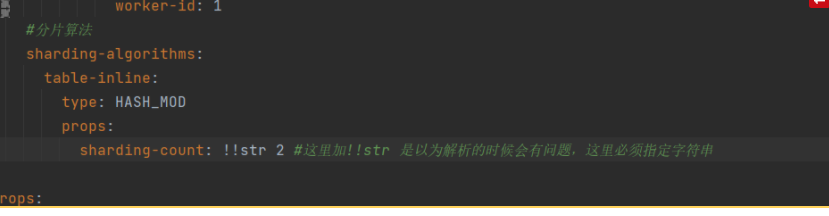
注意:sharding-count 后面的值需要强制指定为字符串 不然会报错,应该是有问题的;
1 | @Test |
这样就完成根据字符串的hash取模分片处理
完整配置如下
1 | spring: |
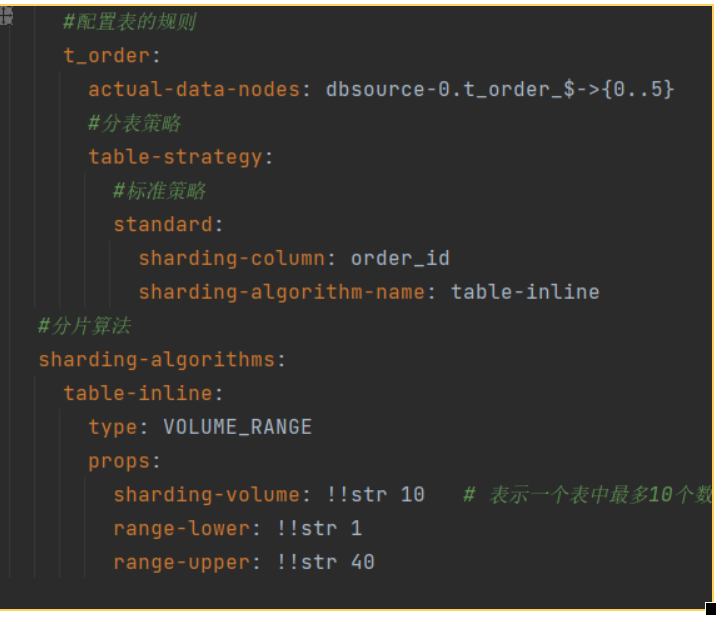
基于分片容量的范围分片算法
根据数据的容量进行拆分;比如一个需求一个表中最多只让存10条数据,就可以使用这个分片算法,用来严格的控制每个表的容量;假设id 使用自增的id;根据数据id 来分片;
设置id 类型为输入,后续会给它指定id
1
2@TableId(type = IdType.INPUT)
private Long orderId;为了演示效果,准备6个数据表 从0 到 5
1 | CREATE TABLE `t_order_5` ( |
配置分片容量算法
修改了 actual-data-nodes 指定了6个表
指定了算法分片容量10 ,最小值是 1 最大值是 40
插入50 条数据演示效果
1
2
3
4
5
6
7
8
9
10
11
12
13
14
15
16
17
18
19
20@Test
void volumeRangeInsert() {
for (int i = 0; i < 50; i++) {
Order order = new Order();
order.setOrderId(Long.valueOf(i));
order.setUserId(233L);
order.setOrderPrice(new BigDecimal("1"));
order.setCity("北京");
orderMapper.insert(order);
}
}
@Test
void volumeRangeQuery() {
QueryWrapper<Order> queryWrapper = new QueryWrapper<>();
queryWrapper.ge("order_id",20L);
List<Order> orders = orderMapper.selectList(queryWrapper);
System.out.println(orders.size());
}
可以看到 order_id 为 0 的独自落到一个表中,接下来的表中数据都为10个,超过就下一个表中,而超过容量的数据都落到最后一个表中;
指定类型使用容量范围分割,比如上面的配置 下限是1 上限是40 分割是10,那么在初始化的时候,会分为几个区间段;
(-∞,1),[1,10],[11,20],[21,30],[31,40][40,+∞) ,对应表的后缀分别根据索引从0 开始分别是 table_0 table_1 table_2 table_3 ,table_4,table_5;
那么插入的数据根据数据的范围来确定落到那个表中;查询的时候也会根据分片条件来查询对应的表;
完整配置如下
1 | spring: |
基于分片边界的范围分片算法
和分片容量的分片算法类型;
配置参数:type: BOUNDARY_RANGE
sharding-ranges: long 类型的可用逗号分割的字符串
和基于容量的分界的算法类似,都是为了能够切分成几个区间;适合区间不太多的场景;
1 | rules: |
注意需要修改 actual-data-nodes 改成可能有3个表,不然会导致表丢失识别不到
如上配置切分了3个区间段;分表对应了表
table_0 ==> -∞,20
table_1 ==> 20,40
table_3 ===> 40,+∞
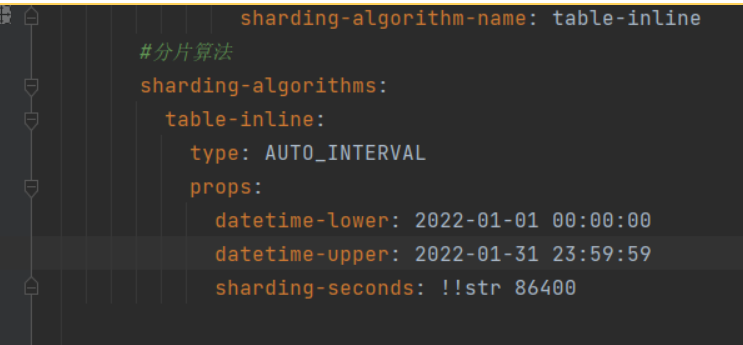
自动时间段分片算法
此类型针对时间字段类型作为分片键进行查询;可根据固定的时间段,比如天,月,年进行分表
配置项:type:AUTO_INTERVAL
datetime-lower:开始的最小时间
datetime-upper:分片结束的时间
sharding-seconds: 每给分片的时间间隔
假如要实现根据每天时间分一个表;
订单增加一个订单时间,根据订单时间作为分片依据
1
2
3@TableField
private LocalDateTime orderTime;首先使用存储过程创建足够的表
1
2
3
4
5
6
7
8
9
10
11
12
13
14
15
16
17
18
19
20
21
22
23
24
25
26
27
28
29
30
31
32
33
34
35
36
37
38
39
40
41
42
43
44
45delimiter //
drop procedure if EXISTS `createTable`;
create procedure createTable()
BEGIN
DECLARE `@i` int(11);
DECLARE `@createSql` VARCHAR(2560);
set `@i`=0;
WHILE `@i`< 32 DO
-- 创建表
SET @createSql = CONCAT('CREATE TABLE IF NOT EXISTS t_order_',`@i`,'(
`order_id` bigint(20) NOT NULL,
`user_id` bigint(20) DEFAULT NULL,
`order_price` decimal(10,2) DEFAULT NULL,
`city` varchar(20) DEFAULT NULL,
`order_time` datetime DEFAULT NULL,
PRIMARY KEY (`order_id`) USING BTREE
) ENGINE=InnoDB DEFAULT CHARSET=utf8mb4'
);
prepare stmt from @createSql;
execute stmt;
SET `@i`= `@i`+1;
END WHILE;
end //
delimiter ;配置根据每天分表,分片的下限和上限,时间间隔;
这样的分片结果会分成
(-∞,lower],(2022-01-01 00:00:00,2022-01-02 00:00:00]….. (upper,+∞)
所以会看到结果,小于等于lower 的分到最小的表中,大于upper的分到最后一个表中;
注意:
可能会报parseDate 的解析时间字符串的错误;
经查询是在 AutoIntervalShardingAlgorithm 类的parseDate 报的错;
里面会通过分片键的toString 方法解析成字符串,然后解析成LocalDateTime;
但是我实体类的LocalDateTime 的toString 方法并不是一个符合yyyy-MM-dd HH:mm:ss 的字符串啊!
最终的解决方法,就是在Order类里getOrderTime 的时候,(见上面的Order代码 )返回了一个格式化的字符串,那么后面获取的时候就能获取到对应的字符串了;见下方实体类;
当然实际的工作中还是要通过自定义分片算法的方式来做分片处理;
1 | package com.example.shardingjdbcdemo.entity; |
标准分片算法
行表达式分片算法
提供了简单的单分片键的,基于goovy 表达式的inline 配置语句;
需要注意的是,inline 不支持范围查询,如果需要范围查询需要配置 allow-range-query-with-inline-sharding:true,走全表扫描的范围查询;
1 | rules: |
时间范围分片算法
type:INTERVAL
一种时间范围的分片,跟自动时间段不同的是,分片的后缀是可以有意义的,比如
t_order_2021_01 t_order_2021_02 可以是以时间为后缀的
下面展示以每个月来分表
- 创建了12个月份对应的表;

配置根据时间范围进行分片
1
2
3
4
5
6
7
8
9
10
11
12
13
14
15
16
17
18
19
20
21
22
23rules:
sharding:
tables:
#配置表的规则
t_order:
actual-data-nodes: dbsource-0.t_order_2021_$->{['01','02','03','04','05','06','07','08','09','10','11','12']}
#分表策略
table-strategy:
#标准策略
standard:
sharding-column: order_time
sharding-algorithm-name: table-inline
#分片算法
sharding-algorithms:
table-inline:
type: INTERVAL
props:
datetime-pattern: yyyy-MM-dd HH:mm:ss
datetime-lower: 2021-01-01 00:00:00
datetime-upper: 2022-01-01 00:00:00
sharding-suffix-pattern: yyyy_MM
datetime-interval-amount: 1
datetime-interval-unit: MONTHS- 测试插入数据
1
2
3
4
5
6
7
8
9
10
11
12
13
14@Test
void dateIntervalInsert() {
LocalDateTime curDate = LocalDateTime.of(2021, 1, 4, 0, 0, 0);
for (int i = 0; i < 20; i++) {
Order order = new Order();
order.setOrderId(Long.valueOf(i));
order.setUserId(233L);
order.setOrderPrice(new BigDecimal("1"));
order.setCity("北京");
order.setOrderTime(curDate);
orderMapper.insert(order);
curDate = curDate.plusMonths(1);
}
}
注意:如果时间范围超过 配置的上限和下限将无法分片,可能会报错
完整配置
1 | spring: |
复合分片算法
复合分片算法 配置策略的时候要配置 complex
复合行表达式分片算法
支持多个分片键并且使用行表达式来分片
假设使用主键id 和userId 来分片,
创建4张表
配置规则
1
2
3
4
5
6
7
8
9
10
11
12
13
14
15
16
17
18
19
20rules:
sharding:
tables:
#配置表的规则
t_order:
actual-data-nodes: dbsource-0.t_order_$->{0..3}
#分表策略
table-strategy:
#多分片键策略
complex:
sharding-columns: user_id,order_id
sharding-algorithm-name: table-inline
#分片算法
sharding-algorithms:
table-inline:
type: COMPLEX_INLINE
props:
sharding-columns: user_id,order_id
algorithm-expression: t_order_$->{(order_id % 2) + (user_id % 2)}
allow-range-query-with-inline-sharding: true测试数据
1
2
3
4
5
6
7
8
9
10
11
12@Test
void complex_inlineInsert() {
for (int i = 0; i < 20; i++) {
Order order = new Order();
order.setOrderId(Long.valueOf(i));
order.setUserId(Long.valueOf(i));
order.setOrderPrice(new BigDecimal("1"));
order.setOrderTime(LocalDateTime.now());
order.setCity("北京");
orderMapper.insert(order);
}
}这个配置只能到 0 到 3 的表中;
完整配置;
1
2
3
4
5
6
7
8
9
10
11
12
13
14
15
16
17
18
19
20
21
22
23
24
25
26
27
28
29
30
31
32
33
34
35
36
37
38
39
40
41
42
43
44
45
46
47
48spring:
application:
name: shardingjdbcDemo
main:
allow-bean-definition-overriding: true
shardingsphere:
#数据源信息
datasource:
#名称为dbsource-0的数据源
dbsource-0:
type: com.zaxxer.hikari.HikariDataSource
driver-class-name: com.mysql.cj.jdbc.Driver
jdbc-url: jdbc:mysql://127.0.0.1:3306/db1?serverTimezone=Asia/Shanghai&useUnicode=true&characterEncoding=utf8&useSSL=false
username: root
password: 123456
names: dbsource-0
#规则的配置
rules:
sharding:
tables:
#配置表的规则
t_order:
actual-data-nodes: dbsource-0.t_order_$->{0..3}
#分表策略
table-strategy:
#多分片键策略
complex:
sharding-columns: user_id,order_id
sharding-algorithm-name: table-inline
#分片算法
sharding-algorithms:
table-inline:
type: COMPLEX_INLINE
props:
sharding-columns: user_id,order_id
algorithm-expression: t_order_$->{(order_id % 2) + (user_id % 2)}
allow-range-query-with-inline-sharding: true
props:
sql-show: true
sql-comment-parse-enabled: true注意:分表策略需要配置成 complex
分片键使用 sharding-columns ,多个使用逗号分割
Hint 分片算法
Hint 分片算法 配置策略的时候要配置 hint
强制路由算法,在其他的算法中需要从sql中解析出对应的分片键和值,而这个算法是通过API强制设置的方式;
Hint 行表达式分片算法
通过inline 表达式和 Api 来实现一个分片算法;
在此配置中,策略为 hint ,不用指定分片键,不从数据中解析分片信息,而是通过一个Api
1 | HintManager 通过 addTableShardingValue 和 addDatabaseShardingValue |
来设置表分片的value 和库分片的value ,在执行数据分片的解析表达式的时候从这个手动设置的值中获取;
添加配置完整配置
1
2
3
4
5
6
7
8
9
10
11
12
13
14
15
16
17
18
19
20
21
22
23
24
25
26
27
28
29
30
31
32
33
34
35
36
37
38
39
40
41
42
43
44spring:
application:
name: shardingjdbcDemo
main:
allow-bean-definition-overriding: true
shardingsphere:
#数据源信息
datasource:
#名称为dbsource-0的数据源
dbsource-0:
type: com.zaxxer.hikari.HikariDataSource
driver-class-name: com.mysql.cj.jdbc.Driver
jdbc-url: jdbc:mysql://127.0.0.1:3306/db1?serverTimezone=Asia/Shanghai&useUnicode=true&characterEncoding=utf8&useSSL=false
username: root
password: 123456
names: dbsource-0
#规则的配置
rules:
sharding:
tables:
#配置表的规则
t_order:
actual-data-nodes: dbsource-0.t_order_$->{0..1}
#分表策略
table-strategy:
#多分片键策略
hint:
sharding-algorithm-name: table-inline
#分片算法
sharding-algorithms:
table-inline:
type: HINT_INLINE
props:
algorithm-expression: t_order_$->{value % 2}
props:
sql-show: true
sql-comment-parse-enabled: true插入数据
1 | @Test |
自定义类分片算法
通过自定义类的方式来实现分片算法,也是比较常用的一种做法,优先是比较灵活,可以做一些自定义的特殊分片逻辑;
根据需求实现不同的类;
STANDARD ==> StandardShardingAlgorithm
COMPLEX ==> ComplexKeysShardingAlgorithm
HINT ==> HintShardingAlgorithm
比如要实现一个自定义的复合分片的算法;
首先确定要实现一个什么样的分片算法,是标准的,多分片键的,还是强制路由的;
确定了后就新增一个自定义类并实现对应的接口;比如要实现一个多分片键的就实现ComplexKeysShardingAlgorithm;
1
2
3
4
5
6
7
8
9
10
11
12
13
14
15
16
17
18
19
20
21
22
23
24
25
26
27
28
29
30
31
32
33
34
35
36
37
38
public class OrderComplexAlgorithm implements ComplexKeysShardingAlgorithm<Long> {
/**
* @param availableTargetNames
* @param shardingValue
* @return
*/
@Override
public Collection<String> doSharding(Collection<String> availableTargetNames, ComplexKeysShardingValue<Long> shardingValue) {
if (!shardingValue.getColumnNameAndRangeValuesMap().isEmpty()) {
//如果是范围查询并且没有路由键信息,全表查询
return availableTargetNames;
}
//只有一个可用的表信息
int size = availableTargetNames.size();
if(size == 1){
return availableTargetNames;
}
//获取逻辑表
String logicTableName = shardingValue.getLogicTableName();
Set<String> finalTargetNames = new HashSet<>();
//获取分片信息
Map<String, Collection<Long>> columnNameAndShardingValuesMap = shardingValue.getColumnNameAndShardingValuesMap();
Set<Map.Entry<String, Collection<Long>>> entries = columnNameAndShardingValuesMap.entrySet();
Long modValue = 0L;
for (Map.Entry<String, Collection<Long>> entry : entries) {
Collection<Long> values = entry.getValue();
Long count = values.stream().findFirst().get();
modValue = (count % size) + modValue;
}
modValue = modValue % size;
finalTargetNames.add(logicTableName + "_" + modValue);
return finalTargetNames;
}写对应的doSharding 逻辑,返回的就是对应的表信息;
配置对应的规则,和基本的配置一样,区别是配置算法的属性的信息的时候要配置strategy 策略 和对应的算法类 algorithmClassName
全配置信息
1
2
3
4
5
6
7
8
9
10
11
12
13
14
15
16
17
18
19
20
21
22
23
24
25
26
27
28
29
30
31
32
33
34
35
36
37
38
39
40
41
42
43
44
45
46spring:
application:
name: shardingjdbcDemo
main:
allow-bean-definition-overriding: true
shardingsphere:
#数据源信息
datasource:
#名称为dbsource-0的数据源
dbsource-0:
type: com.zaxxer.hikari.HikariDataSource
driver-class-name: com.mysql.cj.jdbc.Driver
jdbc-url: jdbc:mysql://127.0.0.1:3306/db1?serverTimezone=Asia/Shanghai&useUnicode=true&characterEncoding=utf8&useSSL=false
username: root
password: 123456
names: dbsource-0
#规则的配置
rules:
sharding:
tables:
#配置表的规则
t_order:
actual-data-nodes: dbsource-0.t_order_$->{0..3}
#分表策略
table-strategy:
#多分片键策略
COMPLEX:
sharding-columns: oder_id,user_id
sharding-algorithm-name: table-inline
#分片算法
sharding-algorithms:
table-inline:
type: CLASS_BASED
props:
strategy: COMPLEX
algorithmClassName: com.example.shardingjdbcdemo.shardingalgorithm.OrderComplexAlgorithm
props:
sql-show: true
sql-comment-parse-enabled: true
分片算法原理
基本说明
ShardingAlgorithm 是分片算法的顶层接口;
1 | StandardShardingAlgorithm 是标准分片算法的接口 |
标准分片接口中定义了2个分片方法,
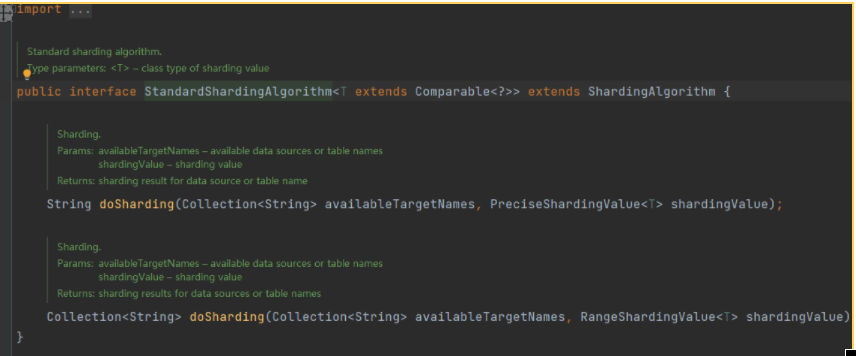
第一个参数是根据配置的 actual-data-nodes 得到了所有真实的表的节点;
当执行普通的不包含范围查询的查询的时候会调用第一个分片得到对应的一个真实表;
而包含范围关系查询的时候会调用第二个方法获取多个需要查询的表;
以最检查的 ModShardingAlgorithm 算法实现逻辑查看;
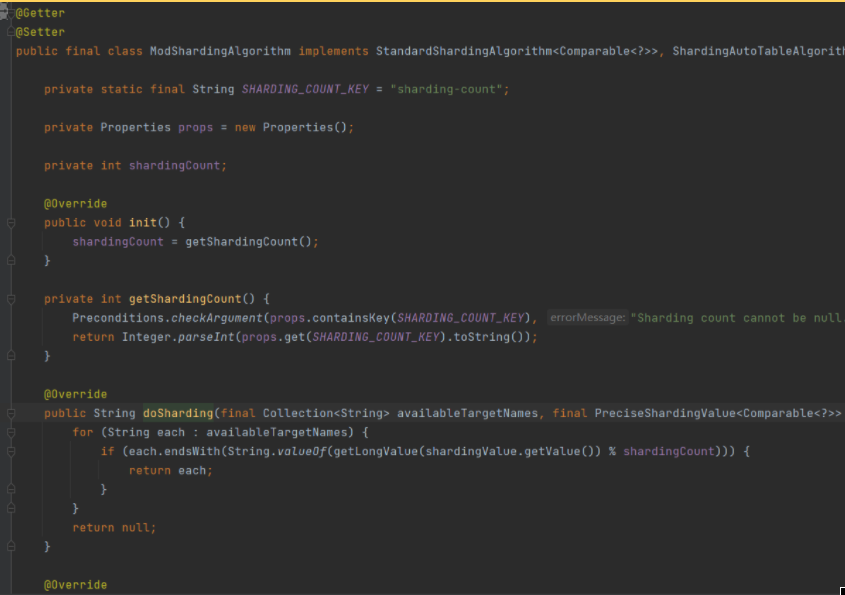
首先可以看到有一些定义的常量值,这些就是此算法可以定义的那些属性,如果想看下具体可以配置那些属性的时候,直接点到对应的类中查看即可;
init() 初始化方法,在算法类被创建的时候会执行一次,做一些初始化的操作,这里是获取配置的分片的数量并记录下来;
doSharding(final Collection
availableTargetNames, final PreciseShardingValue<Comparable<?>> shardingValue)
遍历所有可用的分片表,使用**分片键 (shardingValue 从sql 的值中解析)**的值和可用表做比对;
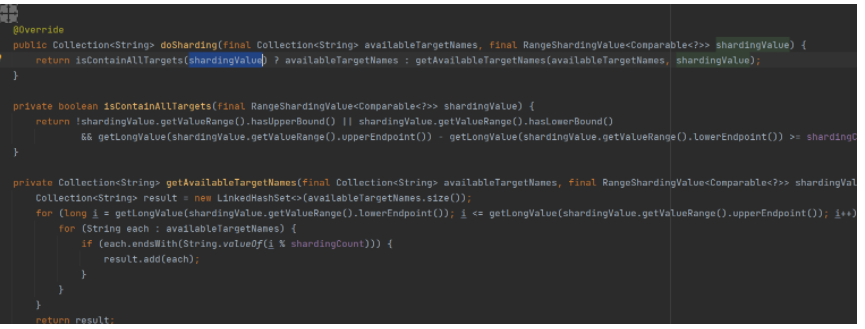
- 范围查询分片doSharding(final Collection
availableTargetNames, final RangeShardingValue<Comparable<?>> shardingValue)
大致逻辑是根据范围查询的上下限的值 来判断当前的查询是否需要查询所有的可用表,如果需要就全部查询得到结果后归并,如果不需要就查询指定的表;目的就是为了能够定位到确定的表;
ClassBasedShardingAlgorithm 说明
ClassBasedShardingAlgorithm 实现了多个分片算法接口,每一种策略的接口都实现了;
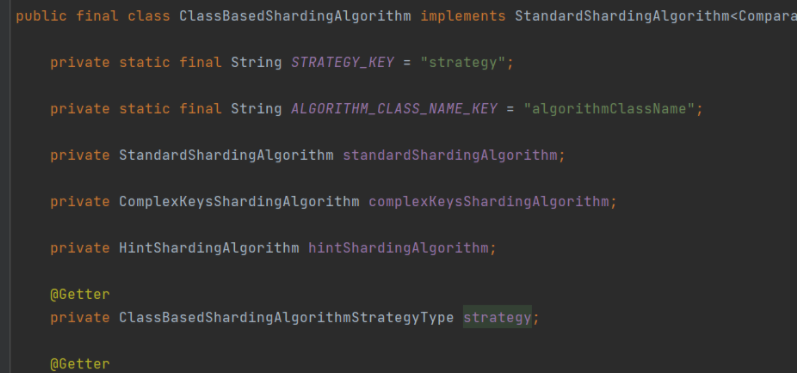
内部聚合了多种算法的接口,以一种静态代理的方式来完成分片逻辑的处理;
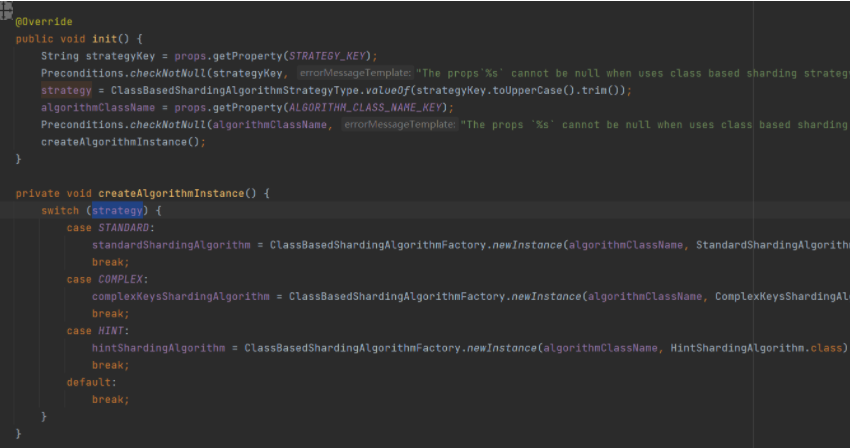
初始化的时候根据配置的策略名称来实例化对应的自定义算法类;
其他的内置算法类的实现都大致差不多,可直接根据配置的type 搜索到对用的具体实现类,有需要的话查看具体逻辑,这里不再赘述;